Rethinking Microservices: Using NATS to Dramatically Simplify Your Microservices

Microservice architecture breaks applications into smaller, independent services that communicate through lightweight protocols like HTTP and gRPC. These services are built around specific business capabilities or domains, such as user management, product cataloging, or order processing. Following domain-driven design (DDD) principles, each service can be independently deployed using a fully automated pipeline, enabling faster and more efficient development and deployment of complex applications.
While microservices offer significant advantages, they can be complex to manage. Development teams need a broader skill set to handle configurations, IP addresses, deployments, and traffic routing. Monitoring, scaling, and fault tolerance become more challenging across numerous services, and increased communication can lead to network congestion. Adhering to the twelve-factor app methodology also adds another layer of complexity, as you have to maintain strict separation between configuration between code and treat logs as event streams. Traditionally, addressing these challenges required third-party solutions, leading to increased costs and maintenance overhead.
This article covers the challenges associated with the traditional microservice architecture and how NATS solves them with a streamlined, efficient approach to building a robust microservices backbone.
Typical Microservice Architecture
Microservices is an architectural style that structures an application as a collection of small autonomous services modeled around a business domain. The architecture is popular due to its ability to provide a high degree of modularity that makes applications easier to develop, test, and deploy. It also allows organizations to evolve their technology stack by enabling each service to use its own distinct technology stack as appropriate.
Let’s first take a look at the architecture of a typical microservices system, consisting of several loosely coupled services:

Each service can communicate with the others via synchronous or asynchronous protocols like HTTP or messaging queues. These are the key integration points in the architecture:
- Load balancer and API gateway: The load balancer distributes incoming network traffic across multiple servers, ensuring the application’s high availability and reliability. The API gateway provides a unified interface for clients to access various services in the microservices system. It also provides additional functionalities like authentication, rate limiting, and caching.
- Cache, service registry, and logs: The cache stores frequently accessed data to reduce the load on the database. It can be used by both the API gateway and the services. The service registry is used to store the IP addresses and ports of the services. On startup, each service registers itself with the service registry. The API gateway and other services can then resolve the destination of a request by querying the service registry. The logs are used to store information generated by the services and can be used for debugging and monitoring purposes.
- Synchronous and asynchronous communication: Microservices communicate with one another using synchronous protocols like HTTP or asynchronous mediums like messaging queues.
- Services and databases: Microservices typically follow the database-per-service pattern, which enables each service to store its state independently of the others.
Building and maintaining a microservices system with third-party services introduces several challenges. The complexity of managing multiple components, increased failure points, domains and scenarios, and operational costs require additional skills to handle the system effectively. Traditional microservice architectures also struggle with addressing concerns like tracing and monitoring, as each service often has its own incompatible logging and monitoring systems. Additionally, if you want to add features such as monitoring, fault tolerance, or canary deployments, this typically requires integrating additional third-party libraries or frameworks that further complicate the system. Rethinking microservice architecture with a unified approach can help solve many of these issues. NATS provides a comprehensive solution that simplifies service communication and efficiently manages the above concerns.
Using NATS to Build a Microservices System
NATS is a powerful messaging system designed for cloud-native applications, IoT messaging, and microservice architectures. It allows secure communication across various platforms, including cloud vendors and on-premise, edge, web, and mobile devices. NATS consists of a family of open source products that are tightly integrated yet can be deployed independently. In addition to messaging, it offers real-time data streaming, resilient data storage, and flexible data retrieval through its JetStream platform. Incorporating NATS in your architecture is easy, as it provides official clients in multiple popular programming languages and can be deployed on VMs or containers.
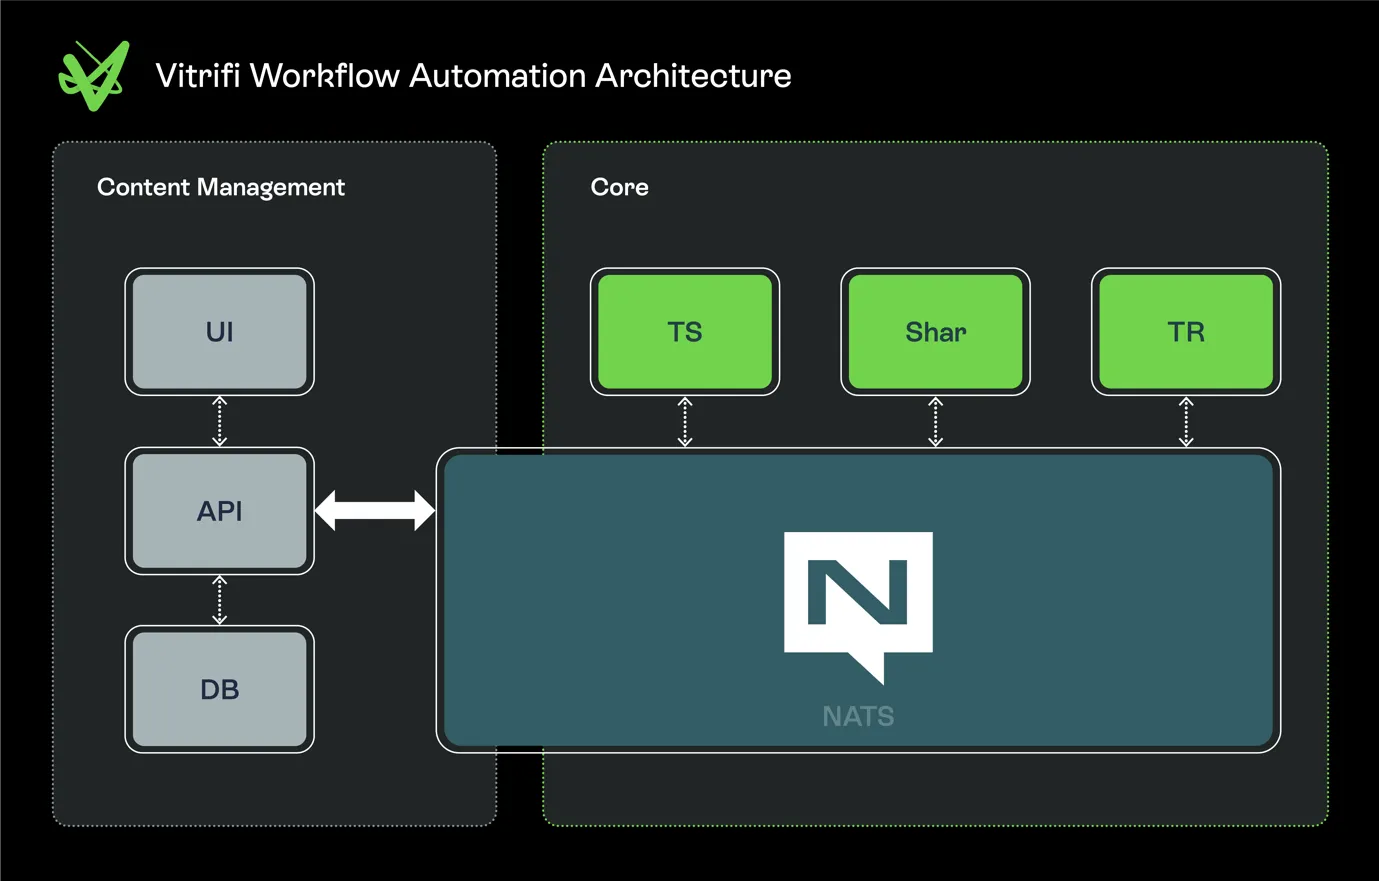
The following diagram illustrates how NATS can be used to build a microservices system that offers the same functionalities as the traditional microservice architecture but with less complexity and overhead:

In this architecture, the services communicate with one another either synchronously or asynchronously, using NATS as the messaging backbone. NATS also replaces the individual databases with durable storage provided by JetStream. Additionally, NATS handles load balancing, service discovery, caching, monitoring, and more, making it easier to build and maintain the microservices system. This allows developers to focus on building the business logic of the services without worrying about these concerns, leading to faster development cycles and more reliable microservices systems.
To illustrate how this approach applies in a real-world scenario, consider Netflix. The company famously implemented a microservice architecture to handle its vast and varied functionality, which ranges from user account management to streaming content delivery. It uses a combination of third-party solutions and custom-built tools to manage its microservices ecosystem. For instance, Netflix uses:
- Zuul for its API gateway: This handles routing, monitoring, resiliency, security, and more.
- Eureka for service discovery: This helps manage the instances of services and ensures that traffic is directed to healthy instances.
- Hystrix for fault tolerance: This handles latency and fault tolerance logic for communication between microservices.
- Ribbon for load balancing: This provides client-side load balancing.
While this approach works, it introduces a significant level of complexity and requires a lot of communication between these tools. Implementing a similar system using NATS could streamline these components by providing a unified backbone for messaging and more. NATS reduces the need for multiple, potentially complex, third-party tools. It can handle service discovery, load balancing, and fault tolerance in a more integrated manner, reducing operational overhead and simplifying the architecture.
The rest of the tutorial uses an example app called “Vote App” (a simple app that allows a user to vote for candidates) to demonstrate NATS in action. While the application uses synchronous and asynchronous communication through NATS with client libraries, you’ll communicate with the app using the NATS CLI. The CLI exposes all the functionalities of the NATS server, including publishing and subscribing to messages, managing streams and objects, and monitoring the server through various commands.
Example App Structure with NATS

Vote App allows users to vote for one of several candidates and consists of three services:
- Voting Service: This service accepts votes from users and consists of the following message subscriber (analogous to an endpoint in a REST API):
vote.send.*, which accepts a vote from the user using the request-reply pattern for a valid candidate. Once the vote is validated, the subscriber sends it to the NATS subjectvote.savefor asynchronous processing by the Vote Processor service. It retrieves the candidate names from Candidate Service using the NATS request-reply pattern.
- Candidate Service: This service stores and manages the candidate names in the NATS key-value store. It consists of one message subscriber:
candidate.get, which retrieves the candidate names from the NATS key-value store and sends them to the requester using the request-reply pattern.
- Vote Processor: This service receives valid votes from Voting Service and updates the vote count for the candidate. It stores the vote data in the NATS object store and consists of the following two message subscribers:
vote.save.*, which saves the vote count in the NATS object store.vote.get, which provides the current vote count for all candidates to the requester using the request-reply pattern.
The following diagram illustrates how the services in Vote App communicate with one another using NATS:

Note that Vote App uses NATS for both synchronous and asynchronous communication between the services. Since the individual services do not need to use any communication protocol, they are also deployed as services and can be scaled horizontally to handle high loads. None of the services require inbound network access, which makes them watertight and secure.
Getting Started
Vote App is a simple .NET-based microservices application. Please prepare your environment by installing the following tools:
- .NET SDK 8.0 or later
- NATS Server
- NATS .NET Client
- The NATS CLI
- An IDE of your choice. If you don’t have a preference, Visual Studio Code with the C# Dev Kit extension is a good choice.
Setting Up NATS Server
For this project, you’ll use NATS Server with JetStream enabled. JetStream is a persistence layer for NATS that provides capabilities to store and retrieve messages via streams and objects. The KV and Object Store are abstractions over a stream. To start a NATS Server with JetStream enabled, run the following command:
nats-server --jetstreamThis will start NATS Server with JetStream on the default port 4222.
Developing the Voting Service
Start with creating a new solution file for the project in a folder named VoteApp using the following commands:
mkdir VoteAppcd VoteAppdotnet new sln --name NATSDemoIn the solution, create a new .NET console application named VotingService and install the NATS.Net and NATS.Client.Serializers.Json NuGet packages using the following commands:
dotnet new console -o VotingServicedotnet sln add VotingServicecd VotingServicedotnet add package NATS.Netdotnet add package NATS.Client.Serializers.JsonAdd the following code to the Program.cs file to implement Voting Service:
1using NATS.Client.Core;2using NATS.Client.Serializers.Json;3using NATS.Client.Services;4
5// Set the ad-hoc JSON serializer registry as the default for the connection.6var serializerRegistry = NatsJsonSerializerRegistry.Default;7
8var natsConnectionOptions = NatsOpts.Default with { SerializerRegistry = serializerRegistry };9
10await using var connection = new NatsConnection(natsConnectionOptions);11
12// Register as service with NATS13var svc = new NatsSvcContext(connection);14await using var service = await svc.AddServiceAsync(new("vote", "1.0.0")15{16    Description = "Casts vote for candidate",17});18
19// Receiver for vote.send20await service.AddEndpointAsync<object>(HandleMessage, "send", "vote.send.*");21
22Console.WriteLine("Voting Service is ready.");23Console.ReadKey();24return;25
26async ValueTask HandleMessage(NatsSvcMsg<object> msg)27{28    var candidateId = Convert.ToInt32(msg.Subject.Split('.')[^1]);29    Console.WriteLine($"Received vote for candidate: {candidateId}");30
31    // Retrieve the candidate IDs from the Candidate Service32    var candidateResponse = await connection.RequestAsync<object, Dictionary<int, string>>("candidate.get", null);33    var candidates = candidateResponse.Data?.Keys.ToList() ?? [];34
35    // Validate the candidate ID36    if (!candidates.Contains(candidateId))37    {38        await msg.ReplyAsync("Invalid candidate ID");39    }40    else41    {42        //Publish the vote to the Vote Processor service43        await connection.PublishAsync("vote.save", candidateId);44        await msg.ReplyAsync("Vote has been cast");45    }46
47    Console.WriteLine("Vote processed");48}
To transport JSON formatted data between services, NATS provides the NatsJsonSerializer class that uses the .NET System.Text.Json serializer to serialize and deserialize the messages. You can read more about NATS serializers in the NATS guidance.
This example uses the NATS services framework to define the listener as a service that listens for messages on the vote.send.* subject. When you use the services framework, the NATS client library automatically places all subscriptions into a queue group, which makes it easy to scale the service horizontally through built-in load-balancing and geo-affinity. You’ll see how this works with the Vote Processor service later in the example. It also simplifies the discovery and monitoring of services.
The HandleMessage handler activates synchronously when it receives a vote message from the user, which you’ll build using the NATS CLI later. It first reads the candidate ID that it receives from the final part of the subject. It then verifies the candidate ID by requesting the candidate list from Candidate Service via a synchronous request through the candidate.get subject. In response, it receives a list of valid candidate IDs. If the candidate ID is valid, it publishes a message to the vote.save subject to save the vote. Finally, it sends a reply to the user confirming that the vote has been cast.
Although the NATS library supports passing cancellation tokens to all NATS and JetStream operations, it has been deliberately left out to maintain the brevity of the solution. In production code, you should use cancellation tokens to ensure that operation cancellations lead to the proper disposal of connections and other shared resources.
Developing the Candidate Service
Add another .NET console application named CandidateService to the solution and install the NATS.Net and NATS.Client.Serializers.Json NuGet packages to it for messaging and serialization support.
To implement Candidate Service, add the following code to the Program.cs file:
1using NATS.Client.Core;2using NATS.Client.JetStream;3using NATS.Client.KeyValueStore;4using NATS.Client.Serializers.Json;5
6// Set the ad-hoc JSON serializer registry as the default for the connection.7var serializerRegistry = NatsJsonSerializerRegistry.Default;8
9var natsConnectionOptions = NatsOpts.Default with { SerializerRegistry = serializerRegistry };10
11await using var connection = new NatsConnection(natsConnectionOptions);12
13var jsContext = new NatsJSContext(connection);14var kvContext = new NatsKVContext(jsContext);15
16// Create a KV bucket named candidates17var candidateStore = await kvContext.CreateStoreAsync(new NatsKVConfig("candidates"));18
19// Add seed data to the candidates bucket20await candidateStore.PutAsync("1", "Cat");21await candidateStore.PutAsync("2", "Dog");22await candidateStore.PutAsync("3", "Fish");23
24Console.WriteLine("Candidate Service is ready.");25
26// Receiver for candidate.get27await foreach (var message in connection.SubscribeAsync<string>("candidate.get"))28{29    Console.WriteLine("Received candidate fetch request");30
31    // Retrieve the candidates from the KV store32    var candidateList = new Dictionary<int, string>();33    await foreach (var key in candidateStore.GetKeysAsync())34    {35        candidateList.Add(Convert.ToInt32(key), (await candidateStore.GetEntryAsync<string>(key)).Value!);36    }37
38    // Send the candidate list as a response39    await message.ReplyAsync(candidateList);40    Console.WriteLine("Request processed");41}
Candidate Service uses JetStream to store the candidate names in a key-value store named candidates. It first adds seed data to the key-value store and then subscribes to the candidate.get subject to receive requests for the candidate list. When it receives a request, it retrieves the candidate list from the key-value store and sends it back as a JSON response.
Developing the Vote Processor Service
Finally, create a third .NET console application named VoteProcessorService and install the NATS.Net and NATS.Client.Serializers.Json NuGet packages to it.
Add the following code to the Program.cs file to implement the Vote Processor service:
1using NATS.Client.Serializers.Json;2using NATS.Client.Core;3using NATS.Client.JetStream;4using NATS.Client.ObjectStore;5
6var semaphore = new SemaphoreSlim(1, 1);7
8await using var connection = new NatsConnection();9
10var jsContext = new NatsJSContext(connection);11var objectStoreContext = new NatsObjContext(jsContext);12
13// Create an object store named votes14var voteStore = await objectStoreContext.CreateObjectStoreAsync("votes");15
16// Create two receivers for vote.save to demonstrate load balancing between multiple instances17var voteResponder1 = VoteResponder("vote.save", "group1", voteStore, 1);18var voteResponder2 = VoteResponder("vote.save", "group1", voteStore, 2);19
20// Receiver for vote.get21var voteGetResponder = Task.Run(async () =>22{23    await foreach (var msg in connection.SubscribeAsync<string>("vote.get"))24    {25        Console.WriteLine("Received candidate fetch request");26        var candidateVotes = new Dictionary<string, int>();27
28        // Fetch the votes from the vote store29        await foreach (var item in voteStore.ListAsync())30        {31            candidateVotes.Add($"Candidate-{Convert.ToInt32(item.Name)}",32                BitConverter.ToInt32(await voteStore.GetBytesAsync(item.Name)));33        }34
35        // Serialize the candidate votes to JSON using NatsJsonContextSerializer36        await msg.ReplyAsync(candidateVotes,37            serializer: NatsJsonSerializer<Dictionary<string, int>>.Default);38        Console.WriteLine("Request processed");39    }40});41
42Console.WriteLine("Vote Processor Service is ready.");43await Task.WhenAll(voteResponder1, voteResponder2, voteGetResponder);44return;45
46Task VoteResponder(string subject, string queue, INatsObjStore objectStore, int consumerId)47{48    var task = Task.Run(async () =>49    {50        await foreach (var msg in connection.SubscribeAsync<int>(subject, queue))51        {52            var candidateId = msg.Data;53            Console.WriteLine($"Processor {consumerId}: Storing vote for candidate: {candidateId}");54
55            try56            {57                // Acquire lock to ensure thread safety when updating the vote count58                await semaphore.WaitAsync();59
60                // Increment the vote count for the candidate61                var dataBytes = await objectStore.GetBytesAsync(candidateId.ToString());62                var voteCount = BitConverter.ToInt32(dataBytes);63                voteCount++;64                await objectStore.PutAsync(candidateId.ToString(), BitConverter.GetBytes(voteCount));65            }66            catch (NatsObjNotFoundException)67            {68                // If candidate record does not exist in the store, create it69                await objectStore.PutAsync(candidateId.ToString(), BitConverter.GetBytes(1));70            }71            finally72            {73                semaphore.Release();74            }75
76            Console.WriteLine($"Processor {consumerId}: Vote saved");77        }78    });79
80    return task;81}
The Vote Processor service primarily completes two tasks:
- Stores vote counts for each candidate in the NATS object store named
votes - Responds to requests for the current vote count for all candidates
The request-reply pattern used with the vote.get subject is the same as the one used in Candidate Service, so you’ll focus on the data storage aspect. You also created two receivers for the vote.save subject, which will later allow you to see how NATS handles load balancing between multiple instances of the same service. To enable load balancing, NATS requires the receivers to be part of the same queue group, which is specified as the second argument to the SubscribeAsync method. In this case, each receiver will randomly receive messages from the vote.save subject.
The VoteResponder method is responsible for storing the vote count for each candidate in the object store. It uses a semaphore to ensure thread safety when updating the vote count. In production, you should consider using a distributed lock or NATS optimistic concurrency control to handle concurrency issues.
Executing Vote App and Exploring How NATS Reduces Microservice Communications
To run Vote App, start Voting Service, Candidate Service, and the Vote Processor service in separate terminal windows using the following commands:
dotnet run --project VotingServicedotnet run --project CandidateServicedotnet run --project VoteProcessorServiceYou’ll now use the NATS CLI to interact with the services and explore some common features of NATS while interacting with Vote App.
NATS as an API Gateway
In the example application, each service is responsible for a specific set of functionalities. NATS acts as an API gateway by abstracting the location of the services from the clients and providing a unified interface for communication. This feature helps reduce overhead in communication by eliminating the need for a third-party API gateway in your architecture.
Execute the following command to send ten votes for candidate 1, which will be served by Voting Service:
nats request --count 10 --reply-timeout=1000ms vote.send.1 ''The following screenshot shows the output of the command. You can also inspect the console messages of the various services to see how the votes are processed:

You can retrieve the candidate list from Candidate Service using the following command:
nats request candidate.get ''The following screenshot shows the output of the command, which lists the candidate names and their IDs:

Use the vote.get command to cast some votes for other candidates. Finally, retrieve the current vote count for all candidates using the following command:
nats request vote.get ''The following screenshot shows the output of the command, which lists the candidate IDs and their corresponding vote counts:

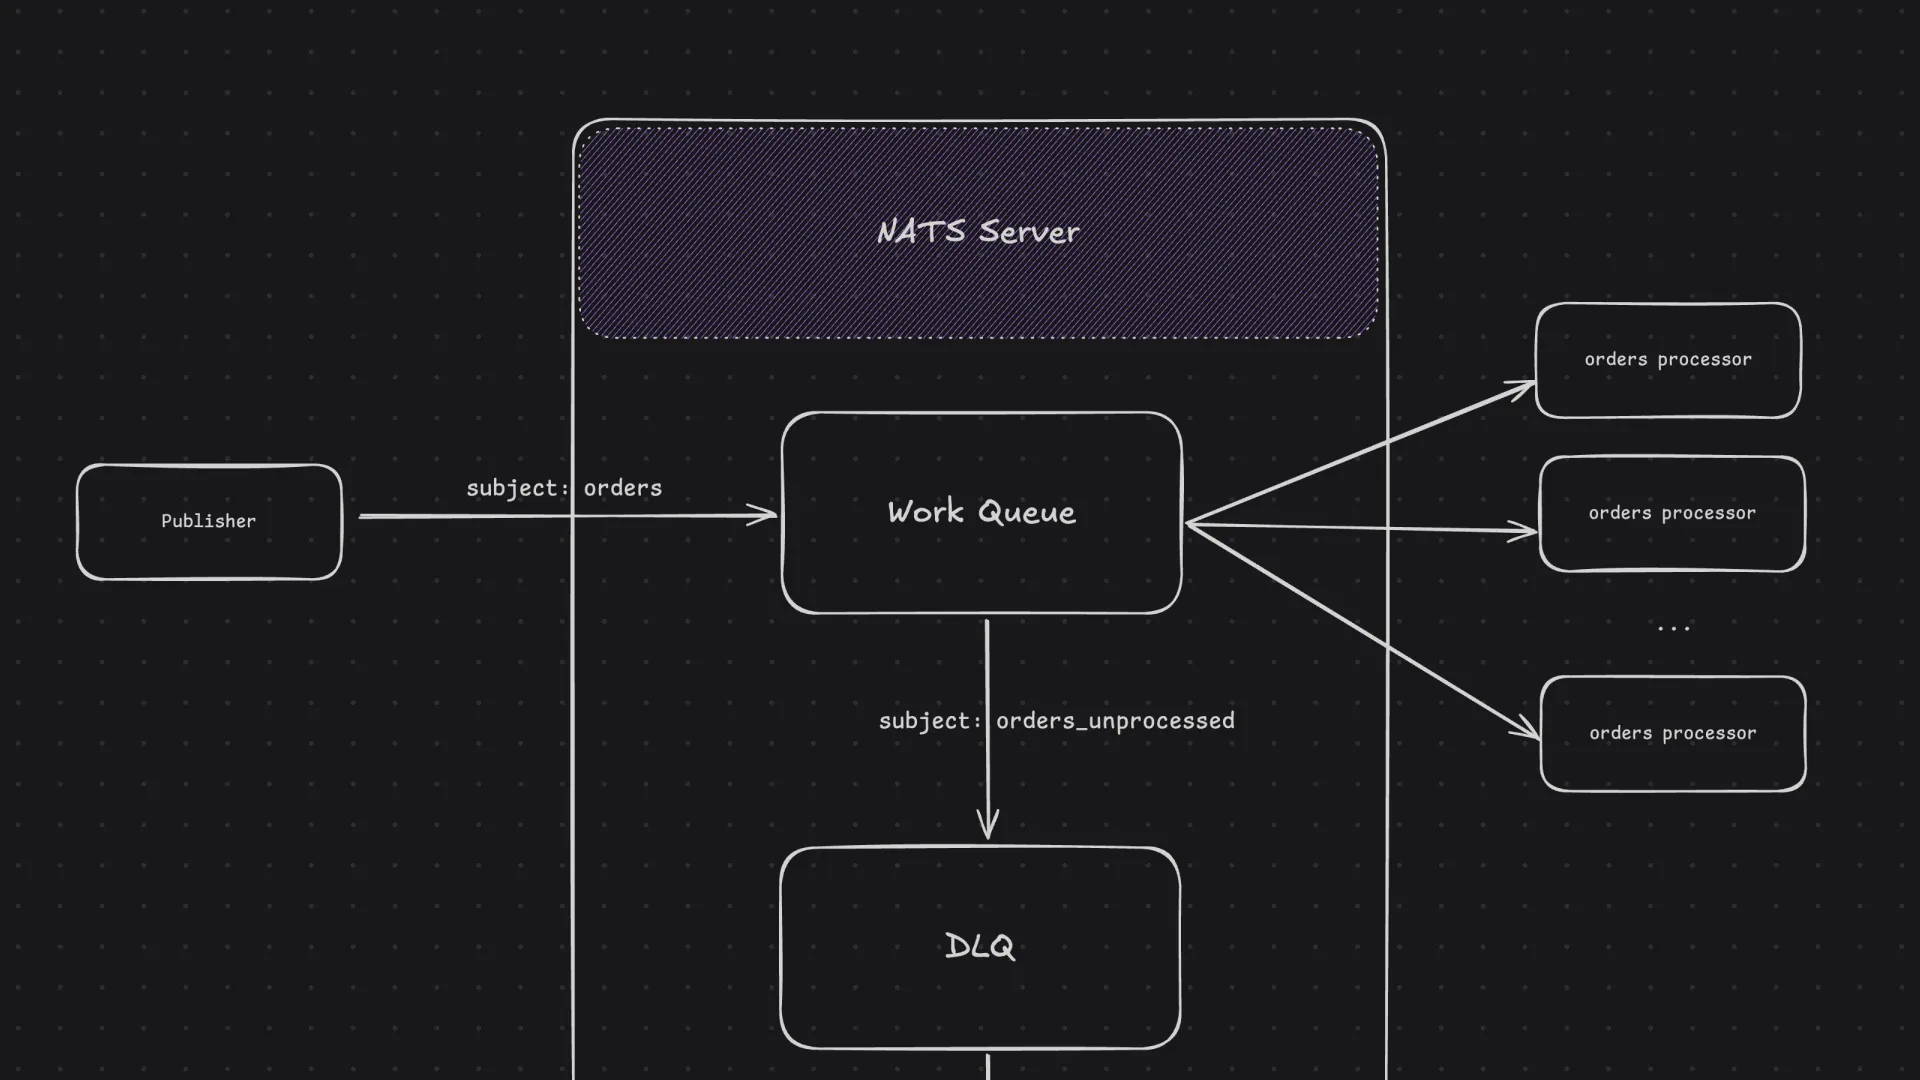
NATS as a Load Balancer
NATS provides distributed load balancing by distributing messages across multiple subscribers to a subject in a queue group. In the example application, you created two receivers for the vote.save subject in the Vote Processor service. Inspect the console messages of the Vote Processor service to see how NATS distributed the incoming messages between the two receivers:

NATS as a Service Discovery Tool
You exposed the services of Vote App using a common subject prefix (vote). You can use the subject naming convention to segregate the services of different applications and enable communication between clients and services (North-South communication) and between services (East-West communication):

NATS as a Monitoring and Observability Service
The NATS services framework provides built-in monitoring and observability features. In the example, Voting Service is registered as a service with NATS, and you can use this command to monitor it:
nats micro stats voteThe following screenshot shows the output of the command. It provides information about the service, like the number of messages processed, the number of errors, and the message processing time:

If you use Prometheus for aggregating metrics from your microservices application, you can use the Prometheus NATS Exporter to send metrics to your desired metrics visualization service, such as Grafana. Since NATS is the medium of communication between services, it can serve traffic metrics for all services registered with NATS, saving you the effort of scraping metrics from individual services.
NATS for Canary Deployment
NATS allows you to route a subset of traffic to new versions of services during a canary deployment. You can achieve this by creating a new subject for the new version of the service and updating the clients to use the new subject. For example, to deploy a new version of Voting Service, you can create a new subject (vote.send.v2) used by the new version of the service and update NATS Server with the following configuration:
1 vote.send.*: [2 { destination: vote.send.$1, weight: 80% },3 { destination: vote.send.v2.$1, weight: 20% }4 ]To learn more about canary deployments with NATS, refer to the official documentation.
NATS as a Data Store
NATS JetStream provides a lightweight data store for storing large stateful information as well as key-value data that can be used as configuration data. The example app uses the NATS object store to store the vote counts for each candidate and the key-value store to store the candidate details.
There are many more features of NATS that are applicable to a microservice architecture, such as distributed tracing, security, and fault tolerance. You can explore these features and more by referring to the code samples on the NATS by Example website.
Conclusion
Building and maintaining a microservices system with third-party services presents several challenges. Managing multiple components adds complexity, increases failure points, and raises operational costs. It also requires specialized skills to manage the system effectively. Traditional microservice architectures often struggle with issues like tracing and monitoring, as each service may have its own incompatible logging and monitoring systems. Additionally, features like monitoring, fault tolerance, or canary deployments typically involve adding more third-party libraries or frameworks, further complicating the system. NATS addresses these issues by simplifying service communication and offering built-in support for essential microservices platform features, thus reducing complexity and overhead.
Synadia, the creator of NATS, offers a fully managed cloud-based NATS service, Synadia Cloud, with features like NATS workflows, alerts, and access control. If you want more control, you can try Synadia Platform, a private cluster that can be run on-premises or in your own cloud enclave, managed by either you or Synadia. Sign up for Synadia Cloud today and experience the power of NATS without the hassle of managing the infrastructure.
You can download the source code for the sample application from GitHub.
Related posts
All posts