Introducing Workloads: NATS-native distributed compute
It turns out that if you build software that’s really good at connecting things and then add a data persistence layer, you’re not far off from being able to run other applications on top. So that’s what we did!
This includes the also just-launched Synadia Connect, which runs as a Workload—so you can run your connectors anywhere NATS runs.
Hello, it’s me (Workloads)
Workloads is our new distributed compute layer. It’s built on top of Nex, the NATS Execution Engine, and all the rest of the NATS primitives (KV, object store, streams). We announced it at RethinkConn 2025, where we moved a running workload from GCP to AWS with zero downtime (moving Workloads via the UI is coming soon). For more on our approach to Workloads, watch the RethinkConn talk.
As of yesterday, all teams with the Starter plan in Synadia Cloud can enable Workloads in their accounts. We’re really, really excited to see what people deploy into our NATS-native environment.
”What kind of things can you deploy?” — I’m glad you asked. Currently, we support two kinds of workloads: containers (via public container registries) and sandboxed JavaScript functions.
Deploy a Workload
To deploy a workload, first you need to enable Workloads in the account settings. You can optionally select a JetStream stream to persist workload logs to.
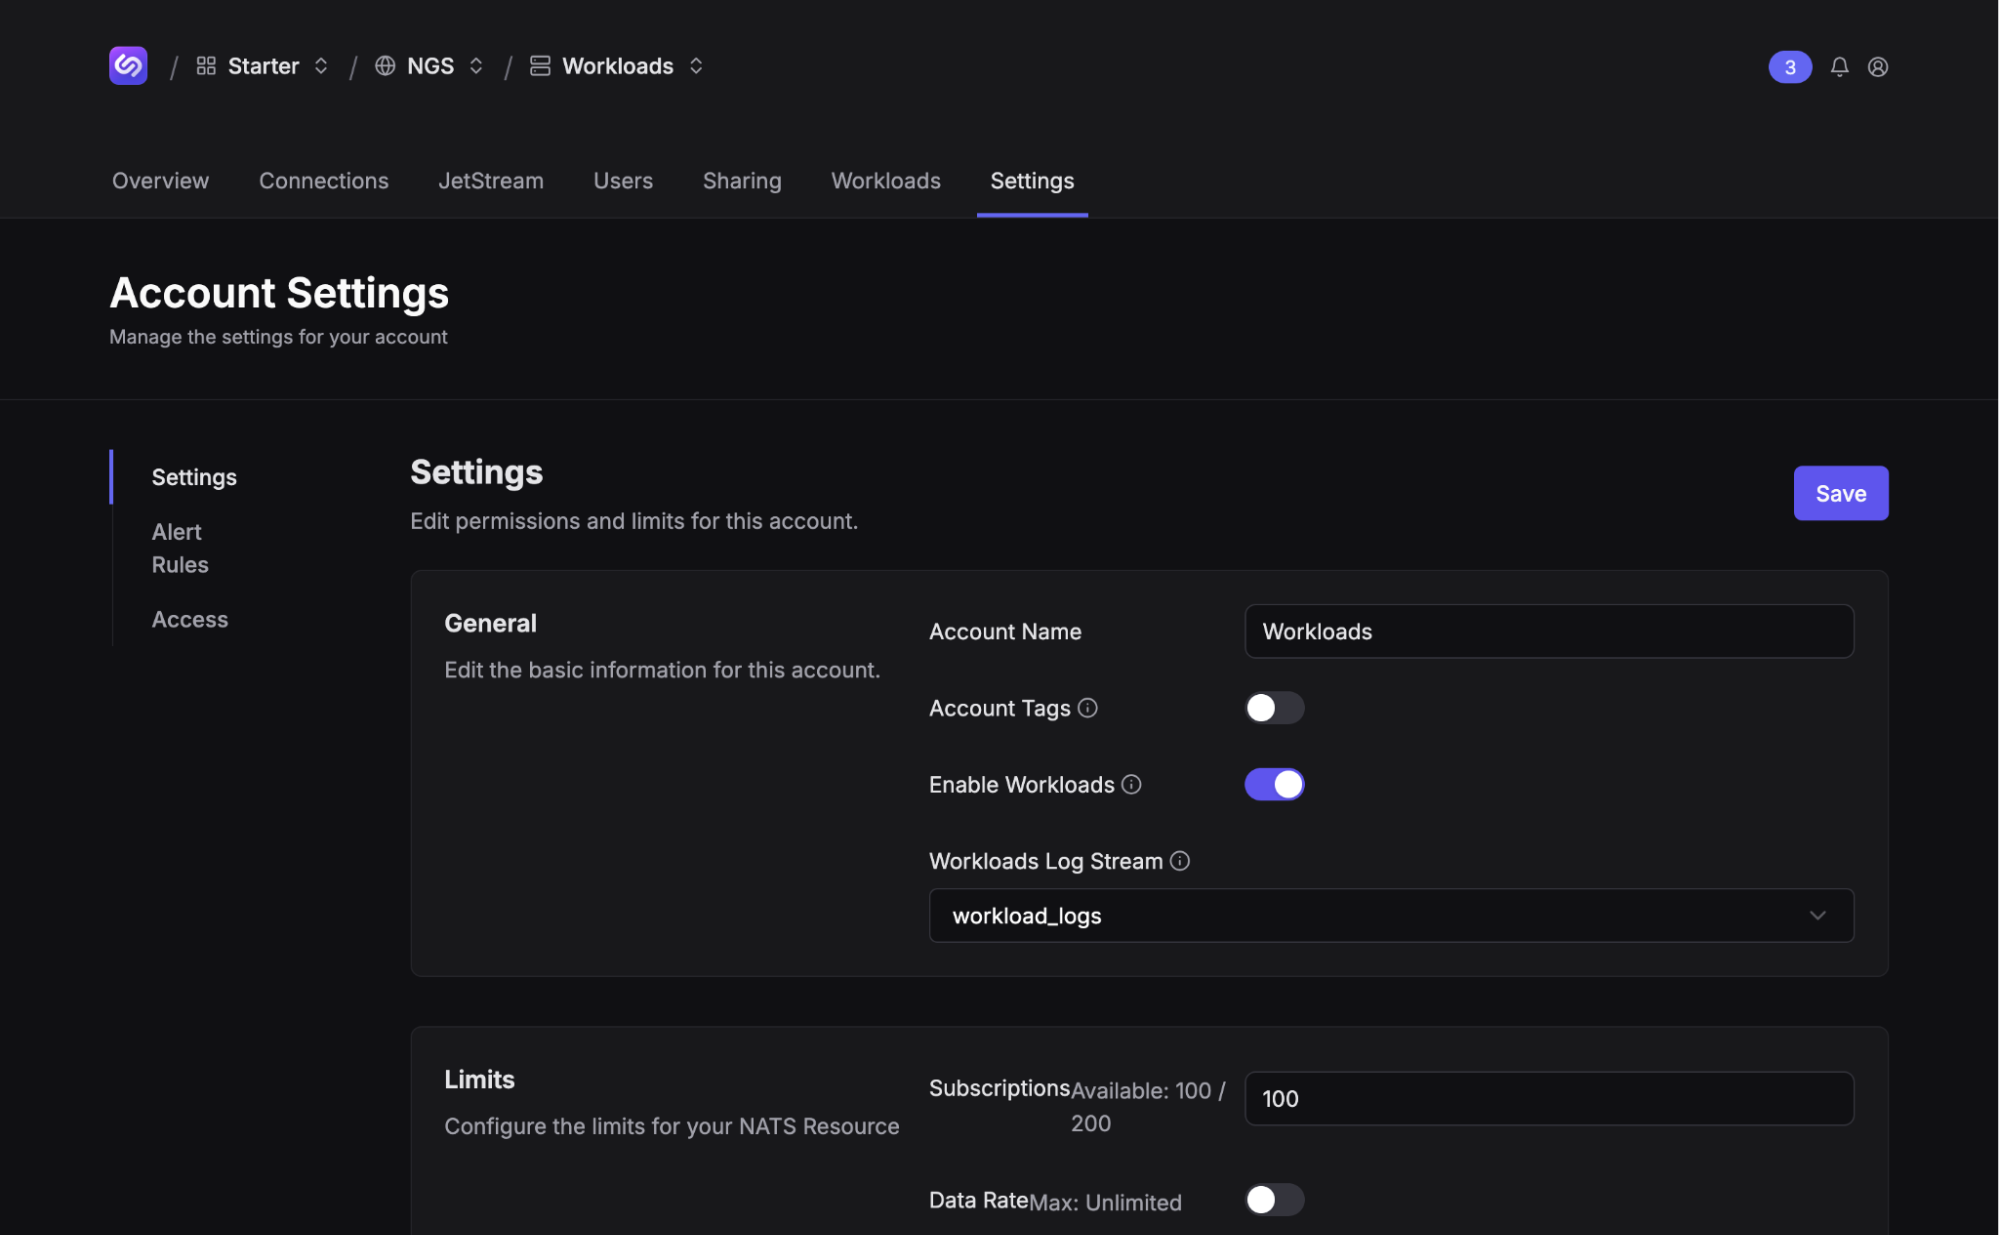
A fancy new tab named “Workloads” should appear. Clicking on it should yield an empty list. Let’s change that.
Fortunately, I have taken the liberty of writing a small NATS micro service that we can deploy. Click that big ol’ purple “Deploy Workload” button. We’ll use the “Container” type and leave the Tags empty. Click “Next”.
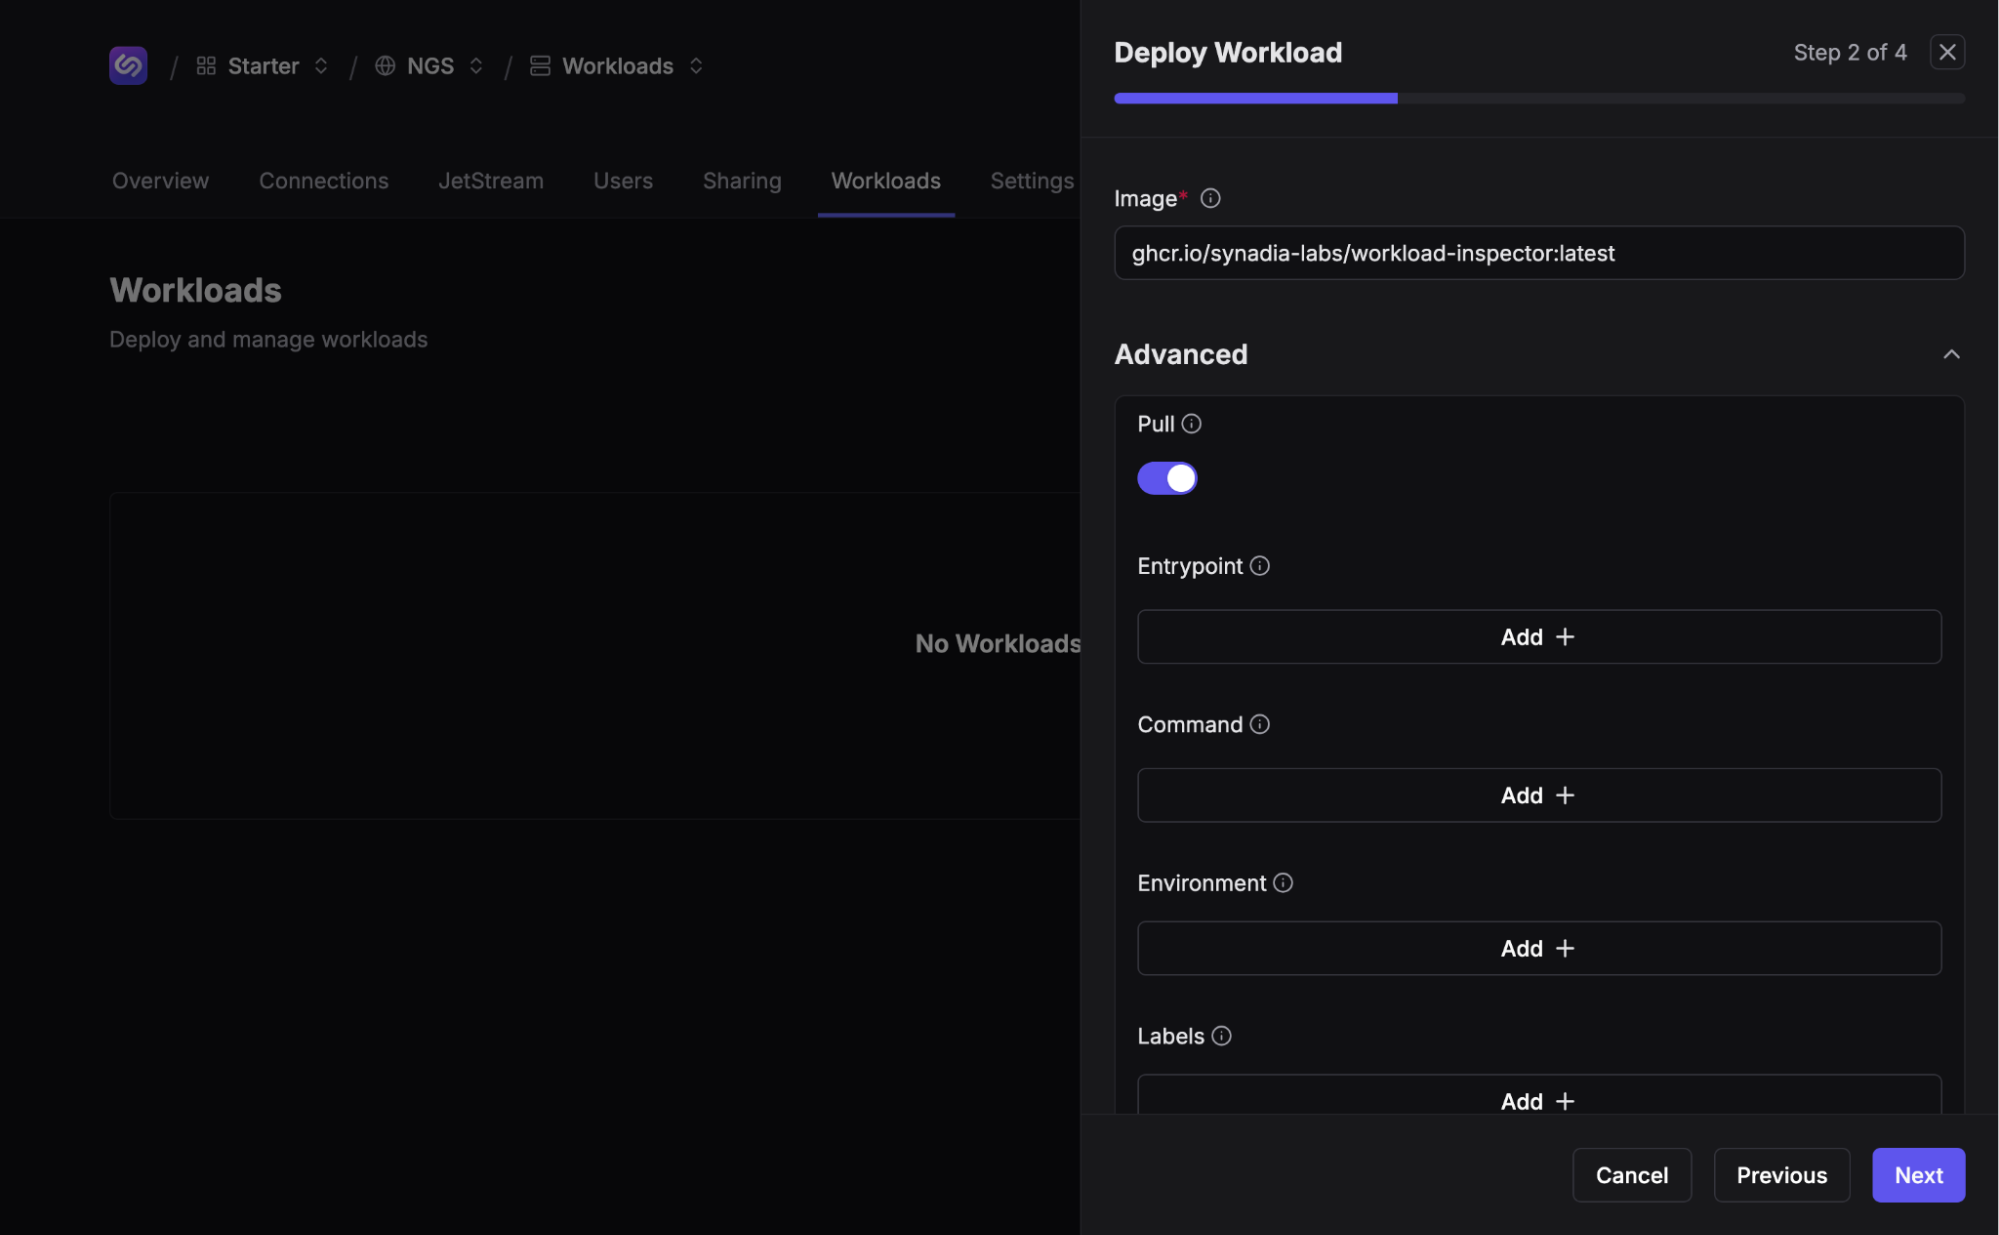
After a brief workload auction, we should see a form asking for a reference to a container image. Enter ghcr.io/synadia-labs/workload-inspector:latest as the image value. The eagle-eyed observer will note an “Advanced” dropdown that yields some… interesting options. If it isn’t already, toggle the “Pull” option on. This tells Workloads that the image should be pulled from the container registry. Click “Next”.
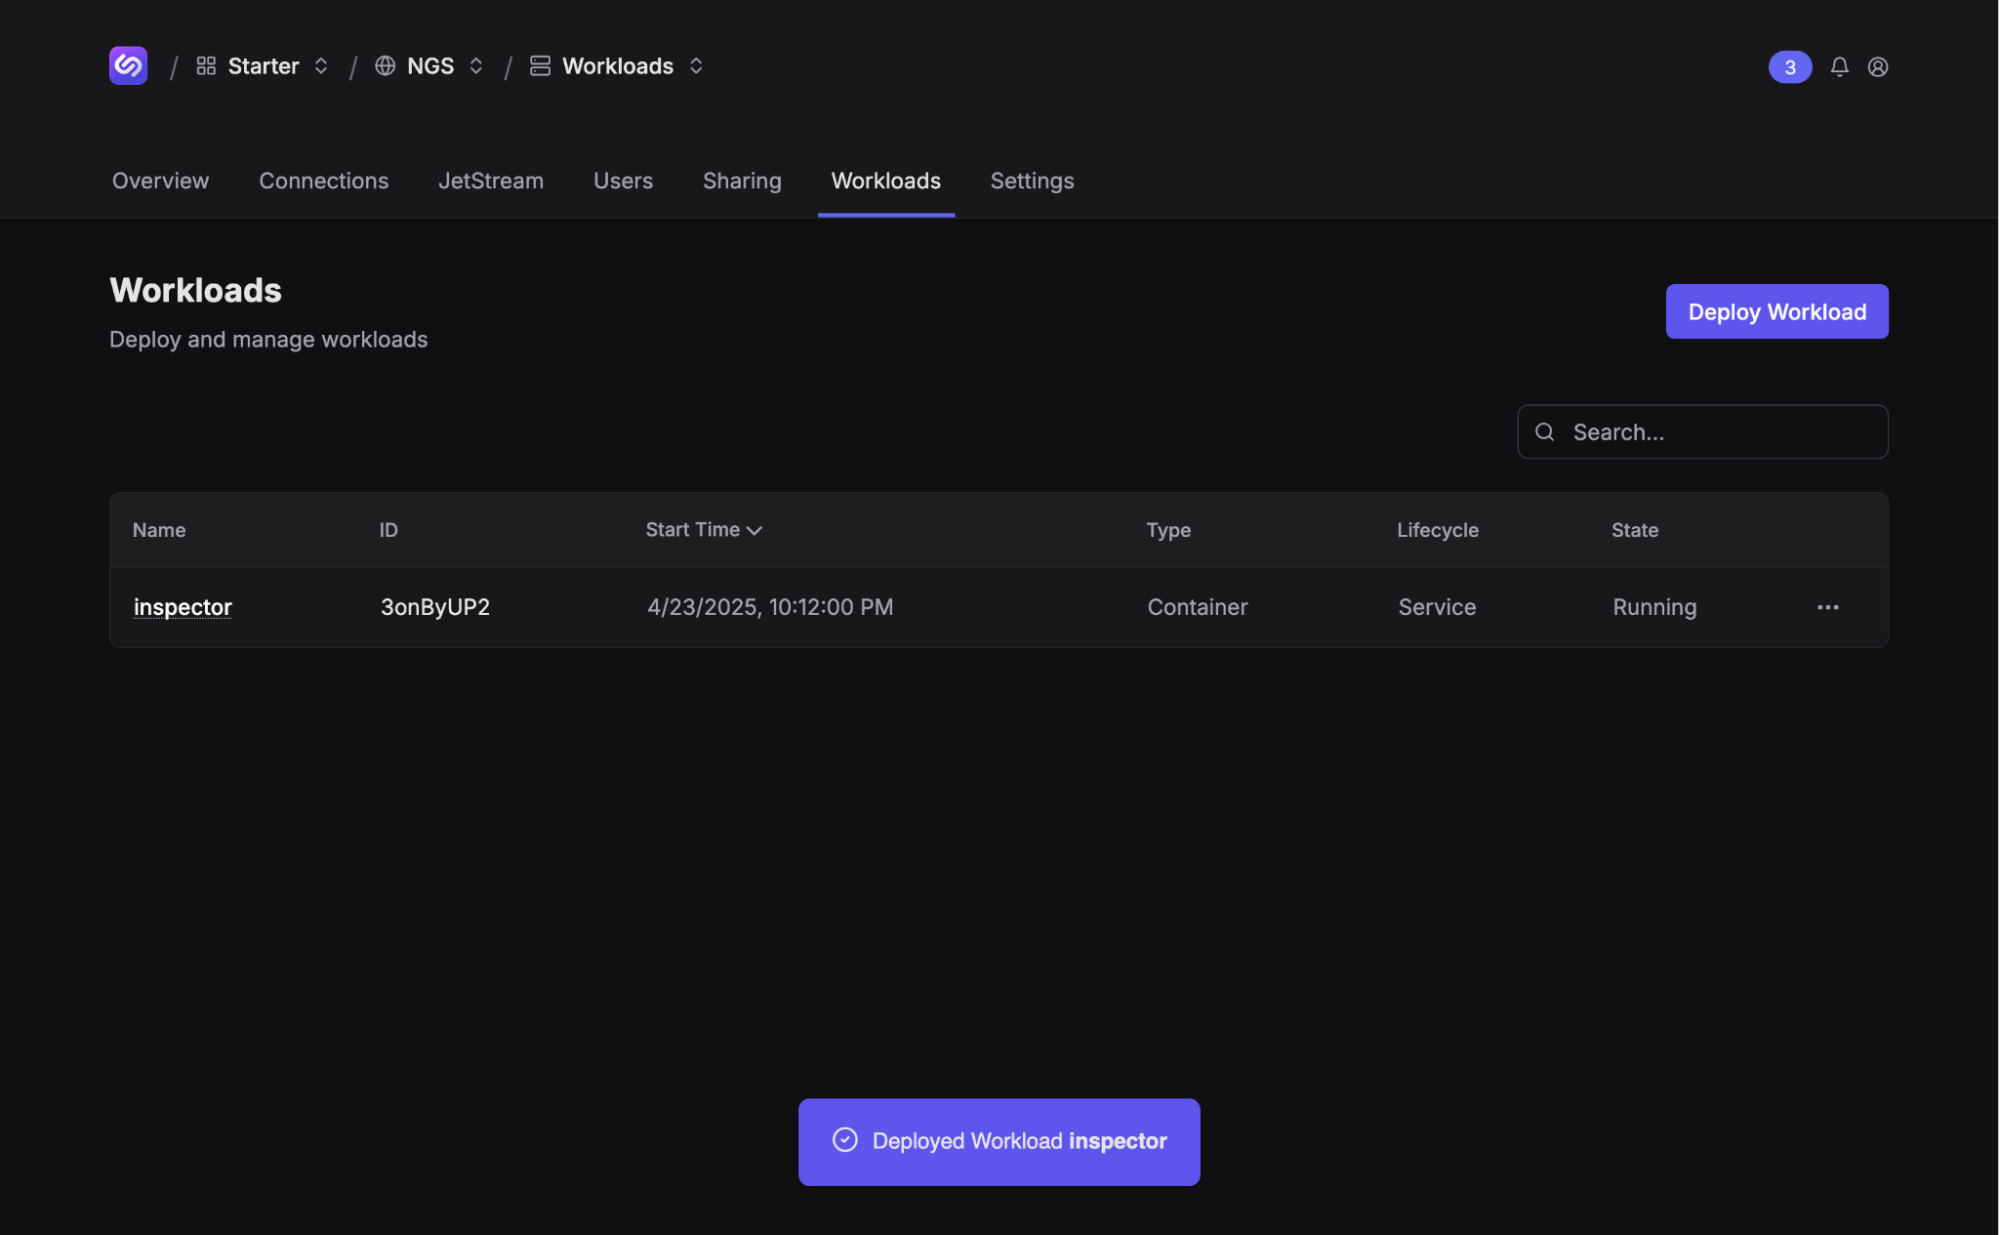
Name your workload something creative, like “inspector”. Click “Next”, review your glorious workload config, and click “Save”. If all goes well, you should now see your new workload.
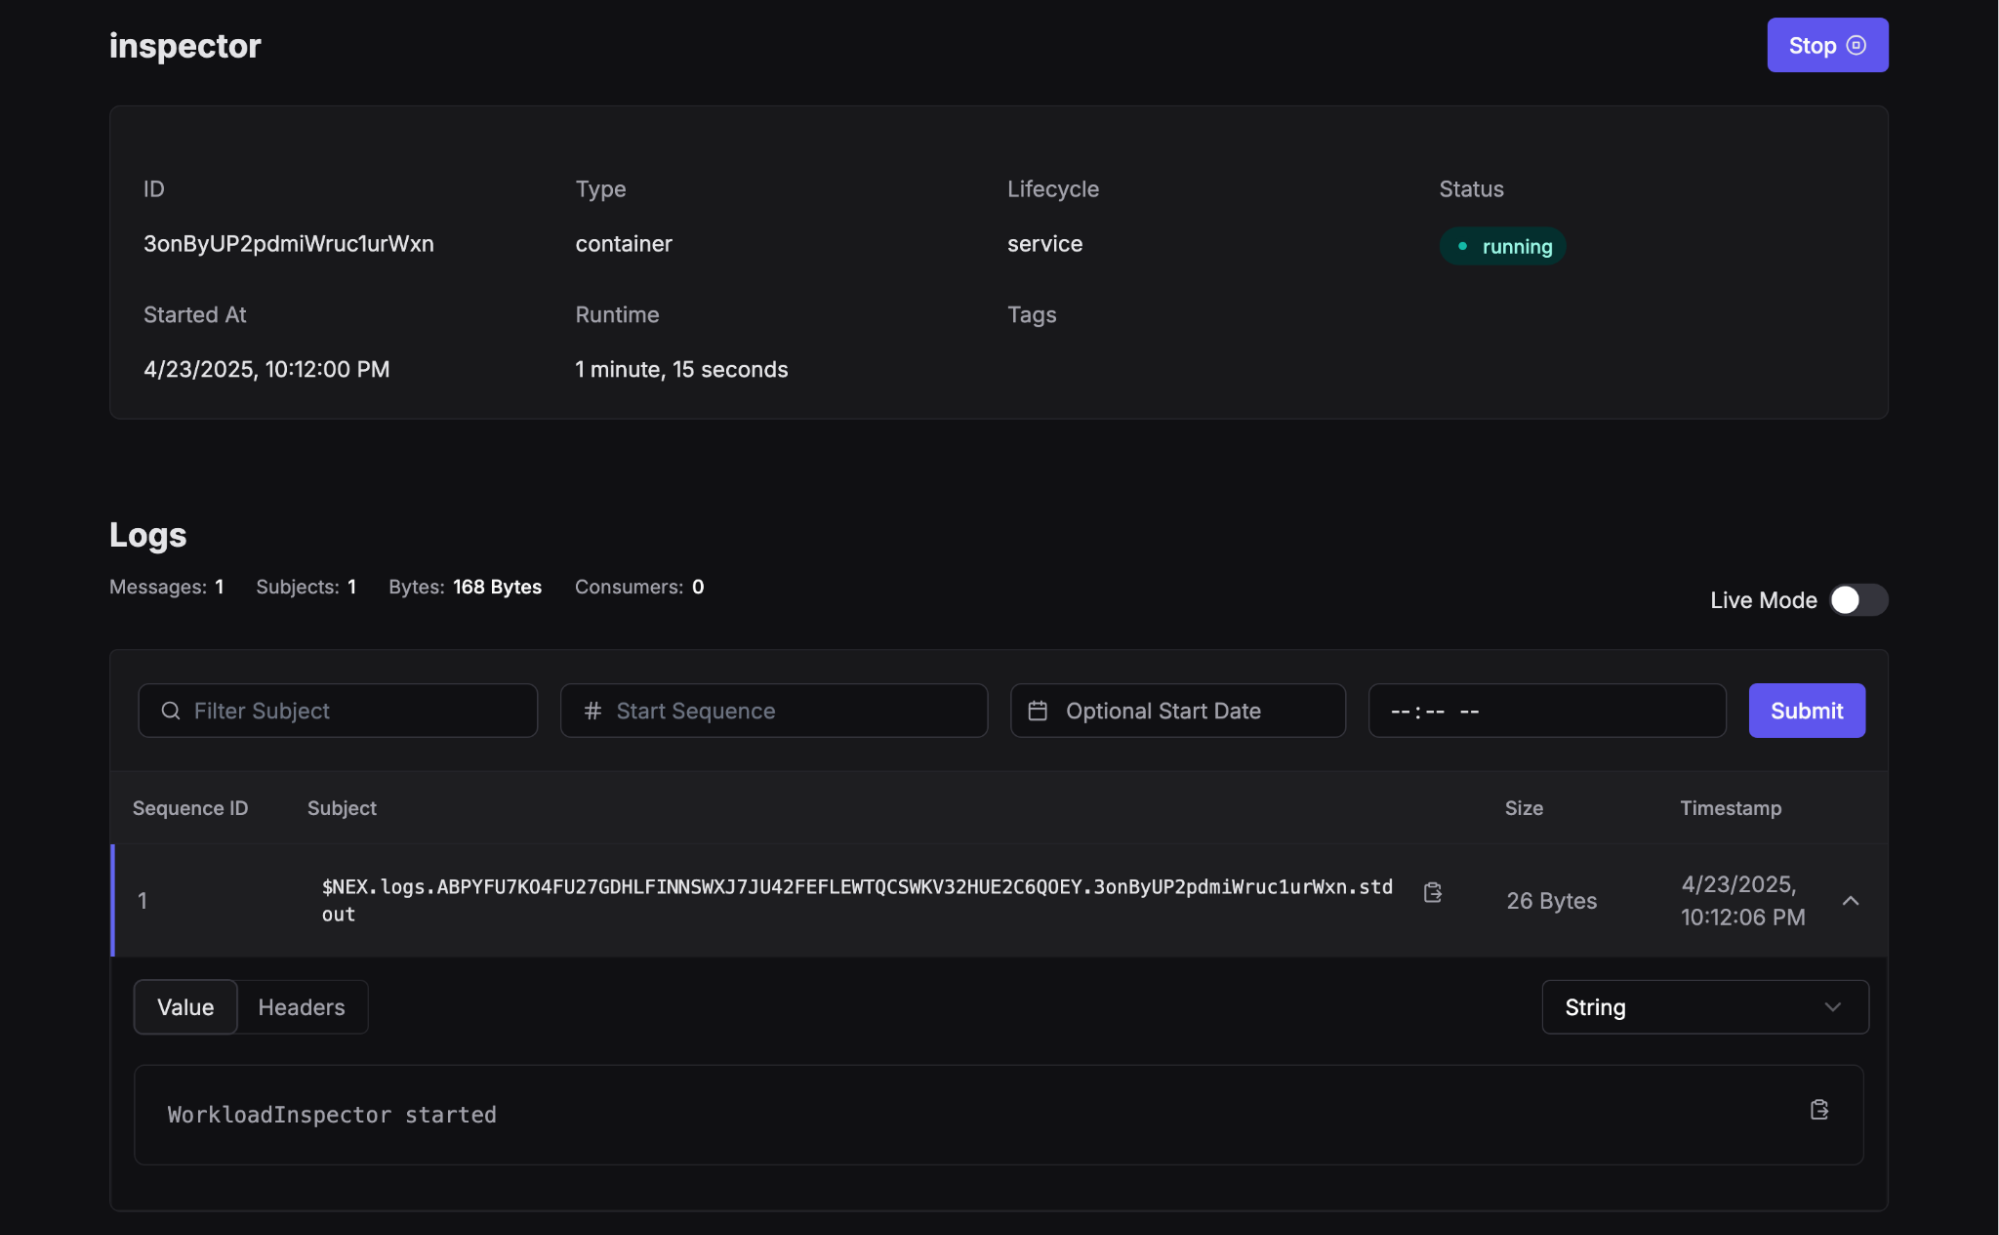
Clicking on the workload shows some interesting details, like how long it’s been running and any logs captured in the workloads log stream. If you didn’t configure a log stream, you’ll still see a Core NATS subscription to the logs subject.
Using the Workload
So far we’ve deployed a Workload—now it’s time to see what it can do. Workloads in Synadia Cloud are deployed with credentials to connect to NGS. Our workload uses those credentials to start a NATS micro service.
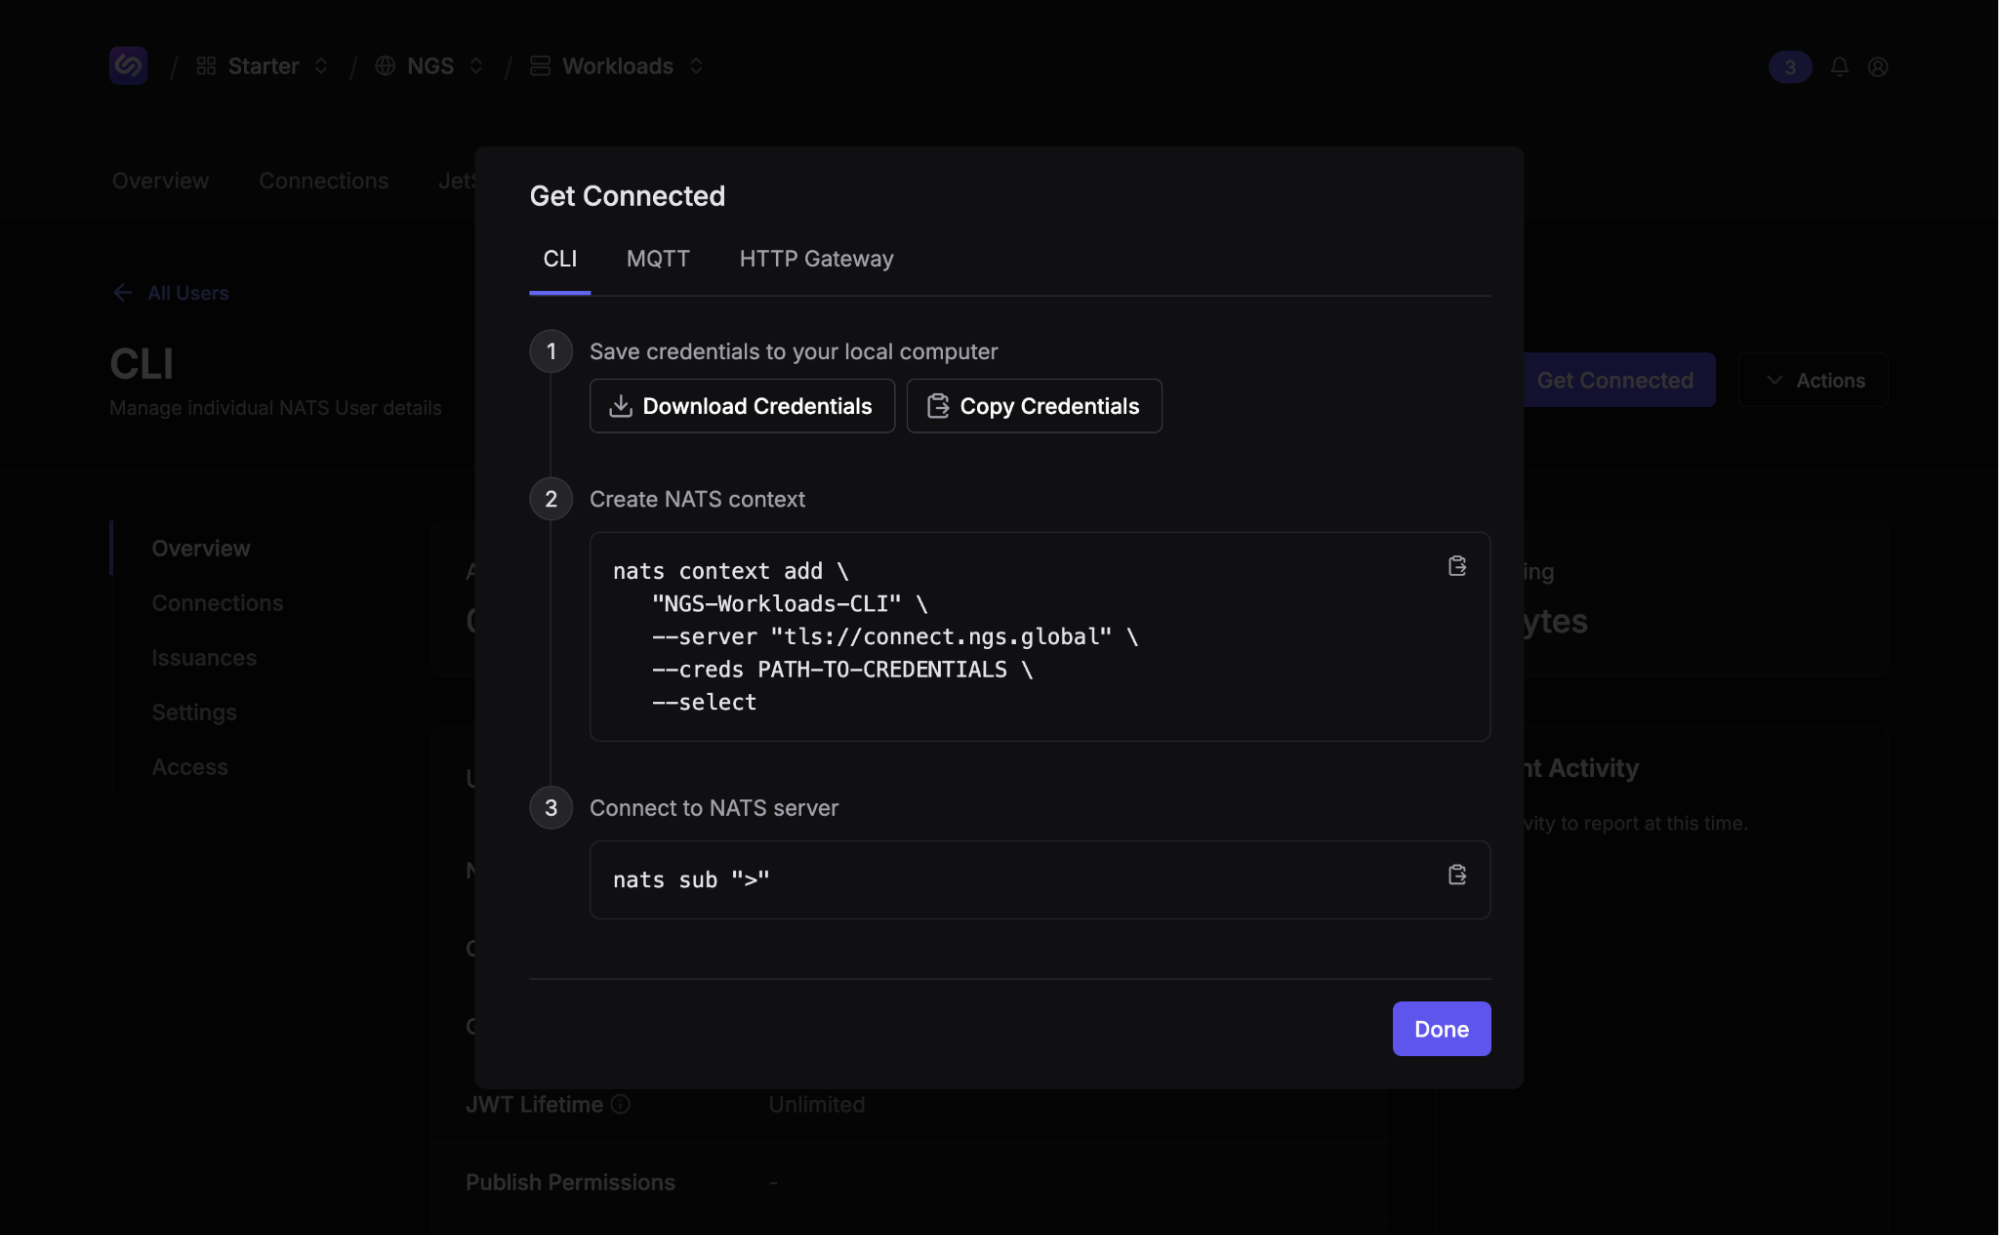
We’ll need NATS user credentials to inspect and use the micro service. Click on the ”Users” tab and create a new user or use the existing “CLI” user. Click on the user, click the “Get Connected” button, and click “Download Credentials”. Store the credentials somewhere safe and use the command in the modal to create a new NATS context.
Bust open your favorite terminal client (I’m partial to Ghostty lately) and list known NATS micros:
nats micro ls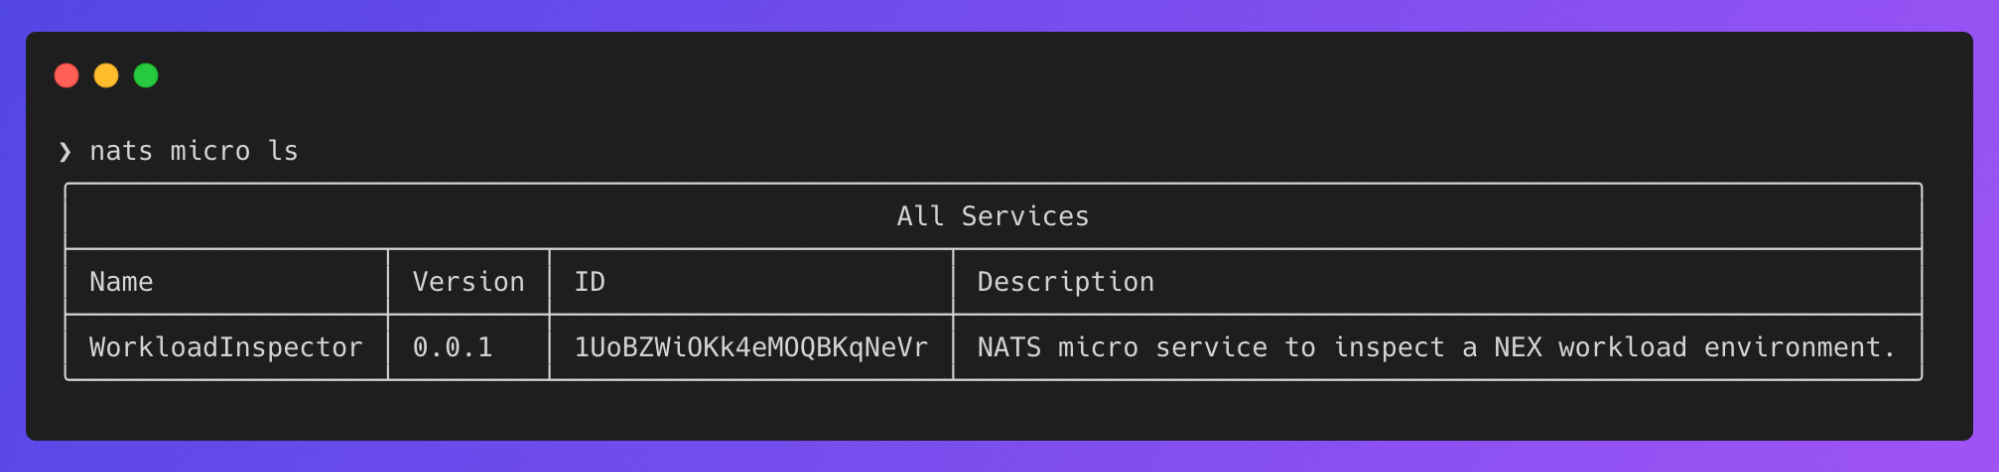
nats micro info WorkloadInspector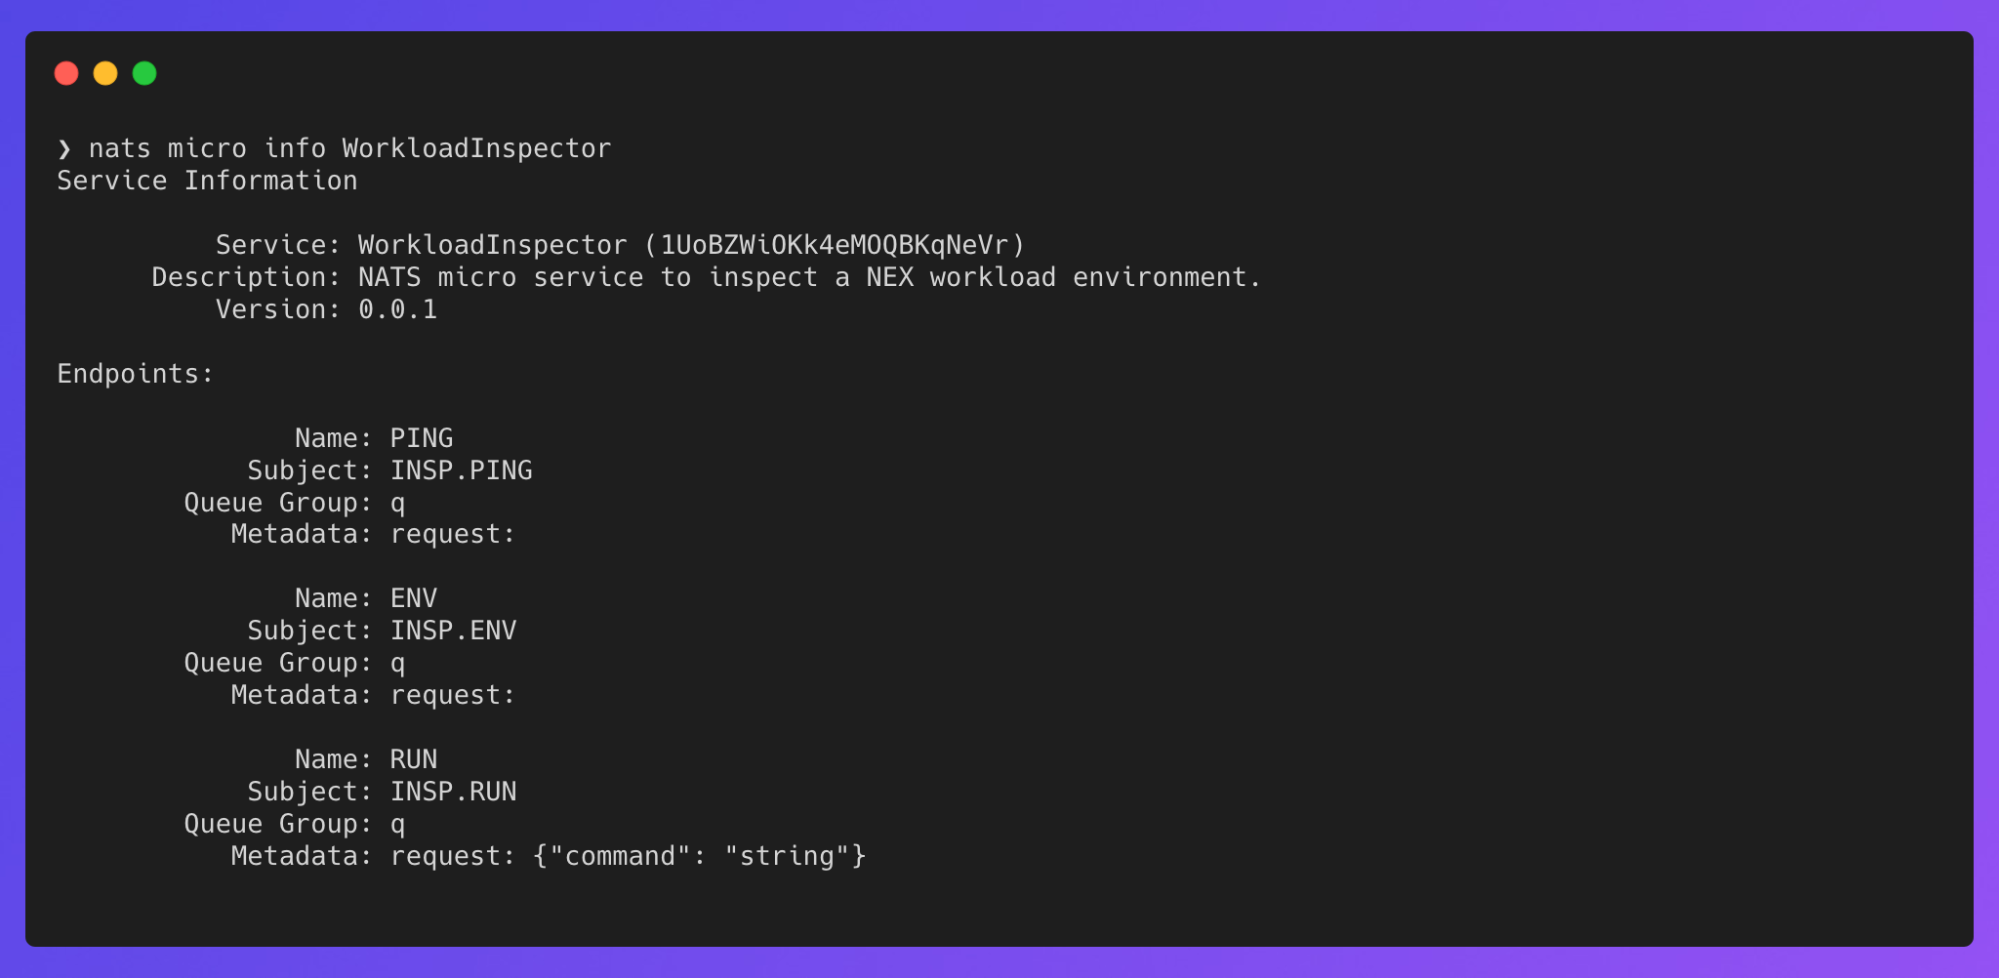
Success! Our workload is running and connected to NGS and we can see its endpoints. Let’s try pinging using the PING endpoint’s subject:
❯ nats req INSP.PING ''22:30:19 Sending request on "INSP.PING"22:30:19 Received with rtt 55.818792msPONGNice. Wonder what the ENV endpoint returns?
❯ nats req INSP.ENV '' | jq22:31:04 Sending request on "INSP.ENV"22:31:04 Received with rtt 58.407292ms{ "HOME": "/home/appuser", "HOSTNAME": "d14a9ce3b48a", "NEX_WORKLOAD_GROUP": "", "NEX_WORKLOAD_ID": "3onByUP2pdmiWruc1urWxn", "NEX_WORKLOAD_NAMESPACE": "you didn't think I would", "NEX_WORKLOAD_NATS_B64_JWT": "leave these credentials", "NEX_WORKLOAD_NATS_NKEY": "...did you?", "NEX_WORKLOAD_NATS_URL": "tls://connect.ngs.global", "PATH": "/usr/local/sbin:/usr/local/bin:/usr/sbin:/usr/bin:/sbin:/bin"}Workloads uses the NATS Execution Engine (Nex). We can see some of the environment variables it injects when running the container. The NEX_WORKLOADS_NATS_* variables are what the workload’s NATS micro is using to connect to NGS.
Let’s see what we can do with the RUN endpoint. Note the RUN endpoint has a request key in its metadata, indicating the expected shape of our NATS message. It expected a JSON payload of {“command”: “<command>”}.
❯ nats req INSP.RUN '{"command": "echo foo"}' | jq22:34:21 Sending request on "INSP.RUN"22:34:21 Received with rtt 65.215958ms{ "stdout": "foo\n", "stderr": "", "code": 0}WOAH! Running shell commands over NATS in a NATS-powered workload? And they said it couldn’t be done…
❯ nats req INSP.RUN '{"command": "ls / | wc -l"}' | jq22:35:43 Sending request on "INSP.RUN"22:35:43 Received with rtt 60.188542ms{ "stdout": "18\n", "stderr": "", "code": 0}Looks like there’s 18 files and folders in the root level (this is really just showing off pipe support).
As a final test, let’s try to publish from the workload and subscribe to the subject on our machine. Start a NATS subscription to man.workloads.are.cool on your local machine (make sure you’re using the NATS context we set up earlier):
❯ nats sub man.workloads.are.cool22:38:37 Subscribing on man.workloads.are.coolIn a separate terminal window, run these commands to install the NATS CLI in the workload container and publish a NATS message, using the micro RUN endpoint:
# download nats cli❯ nats req INSP.RUN '{"command": "wget -q -O /home/appuser/nats.zip https://github.com/nats-io/natscli/releases/download/v0.2.2/nats-0.2.2-linux-amd64.zip"}' --raw{"stdout":"","stderr":"","code":0}
# unzip the nats cli❯ nats req INSP.RUN '{"command": "unzip /home/appuser/nats.zip -d /home/appuser/nats"}' --raw | jq{  "stdout": "Archive:  /home/appuser/nats.zip\n  inflating: nats-0.2.2-linux-amd64/LICENSE\n  inflating: nats-0.2.2-linux-amd64/README.md\n  inflating: nats-0.2.2-linux-amd64/nats\n",  "stderr": "",  "code": 0}
# check the nats cli version❯ nats req INSP.RUN '{"command": "/home/appuser/nats/nats-0.2.2-linux-amd64/nats --version"}' --raw | jq{  "stdout": "0.2.2\n",  "stderr": "",  "code": 0}
# publish a nats message❯ nats req INSP.RUN '{"command": "/home/appuser/nats/nats-0.2.2-linux-amd64/nats --server=\"tls://connect.ngs.global\" pub --creds=/home/appuser/creds.txt man.workloads.are.cool \"👋 from workloads\" "}' --raw | jq{  "stdout": "",  "stderr": "05:49:51 Published 19 bytes to \"man.workloads.are.cool\"\n",  "code": 0}
You should see a NATS message in the terminal window with the subscription:
❯ nats sub man.workloads.are.cool22:38:37 Subscribing on man.workloads.are.cool
[#1] Received on "man.workloads.are.cool"👋 from workloads
El Fin
This has been just a taste of what you can do with Workloads on Synadia Cloud. If you’re on a Cloud Starter plan, you can run a Service (container) or Function (JavaScript) workload today!
Workloads will be rolling out to all other paid Cloud plans shortly. For Synadia Platform customers, please reach out for a guided onboarding to Connectors.
If you have others questions, please take a look at the docs, or jump into the NATS Slack and start a thread.
Go forth and run Workloads and tell us about the cool things you’re running!
Related posts
All posts