Say Hello to Synadia Connectors

A question we frequently get is “How do I connect my external services to NATS?” and it became frustrating to always answer with “It depends”. Sure, there are existing options. You could build a bridge yourself. Or you could use 3rd party tooling. But most teams don’t have the bandwidth to build anything more than a wobbly footbridge. So we’re building an easy button - a bridge that is simple to spin up quickly and grows with your needs.
Synadia Connectors is just that; an easy and straightforward way to connect your existing systems to NATS from the comfort of Synadia Cloud (or the NATS CLI, if you are a geek like me).
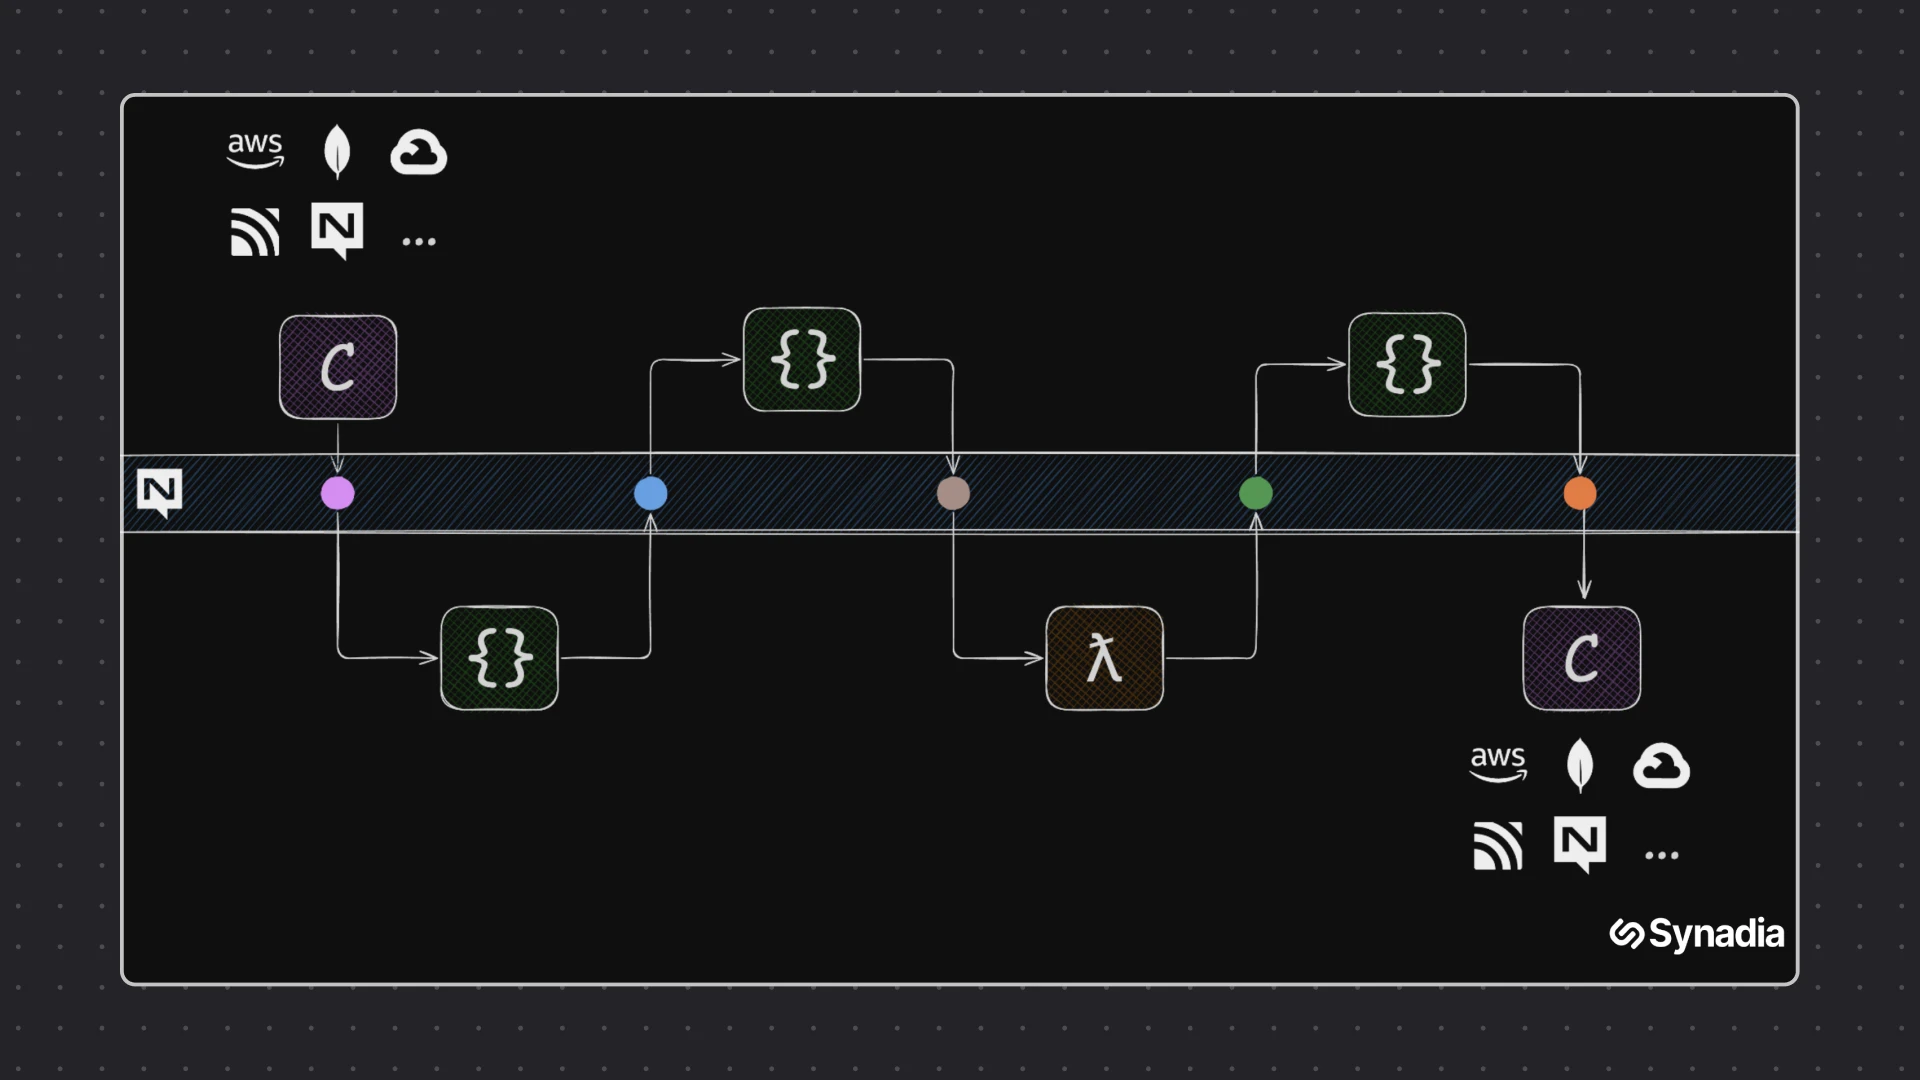
Connectors as Workloads
Connectors run as Workloads, so anywhere NATS runs, on-prem, edge devices, even a Raspberry Pi—you can drop in a Connector with zero extra plumbing.
Under the hood, each Connector is interpreted by a pluggable Runtime. A Runtime is simply an application that reads the Connector specification and executes the integration logic it describes. Because a Runtime can be written in any language or framework, you can tune it for what matters most in your environment. One runtime may be optimized for high throughput, while another may be optimized for low latency.
Today, we provide our Wombat Runtime out of the box. Wombat is a high-performance fork of Benthos (created before Bethos was acquired) that’s able to connect various sources and sinks in a range of brokering patterns and perform enrichments, transformations and filters on payloads (via Bloblang). But you’re free to bring or create your own Runtime as long as it adheres to the spec.
The end result of this Connectors on Workloads approach? A lightweight, location-agnostic integration layer that moves data in and out of NATS with the same simplicity and performance developers already love.
Example: Change Data Capture from MongoDB to NATS
As an example, let’s capture MongoDB data changes and send them to NATS. We will be using MongoDB Atlas to demonstrate this, which requires creating an account and a test cluster in the MongoDB cloud. (MongoDB Atlas performs IP whitelisting. Make sure the Synadia cloud nodes can connect to MongoDB)
MongoDB Change Streams
MongoDB provides Change Streams to expose changes to databases, collections and documents.
For example, the following change is being sent when the type field of a document changes:
1{2 "_id": { "_data": "..." },3 "operationType": "update",4 "clusterTime": { "$timestamp": { "t": 1737103702, "i": 9 }},5 "wallTime": { "$date": "2025-01-17T08:48:22.256Z" },6 "ns": { "db": "sample_mflix", "coll": "movies" },7 "documentKey": { "_id": { "$oid": "573a1390f29313caabcd42e8" }},8 "updateDescription": {9 "updatedFields": {10 "type": "movie"11 },12 "removedFields": [],13 "truncatedArrays": []14 }15}Gathering information
Before we can create our connector, there are a few things we need to know first.
The first thing we need to know is our MongoDB connection string. The connection string contains the MongoDB server we want to connect to as well as our credentials:
1mongodb+srv://daan:<db_password>@test.grwmc.mongodb.net/?retryWrites=true&w=majority&appName=TestThe second thing we need is our NATS server. Connectors in Synadia Cloud automatically connect to NGS (our NATS Global Super-cluster), so all we need to do is select the user whose credentials we want to use.
Last but not least, we need to know the subject we want to write the changes to. In this case we will use connect.demo.mongodb.changes as our subject.
So to summarize, we have the following information available:
| MongoDB Connection String | mongodb+srv://daan:<db_password>@test.grwmc.mongodb.net/?retryWrites=true&w=majority&appName=Test |
|---|---|
| NATS Server (automatic) | tls://connect.ngs.global |
| NATS Subject | connect.demo.mongodb.changes |
Creating the connector
To start to create a connector, click on the purple Create Connector button. This will open the wizard that will guide you through the creation process.
The first decision we have to make is whether we want to create an Inlet or an Outlet. Inlets are connectors which take data from an external system and write it to NATS while outlets do the exact opposite.
Since we are reading from MongoDB and writing to NATS, we select Inlet and proceed to the next step.
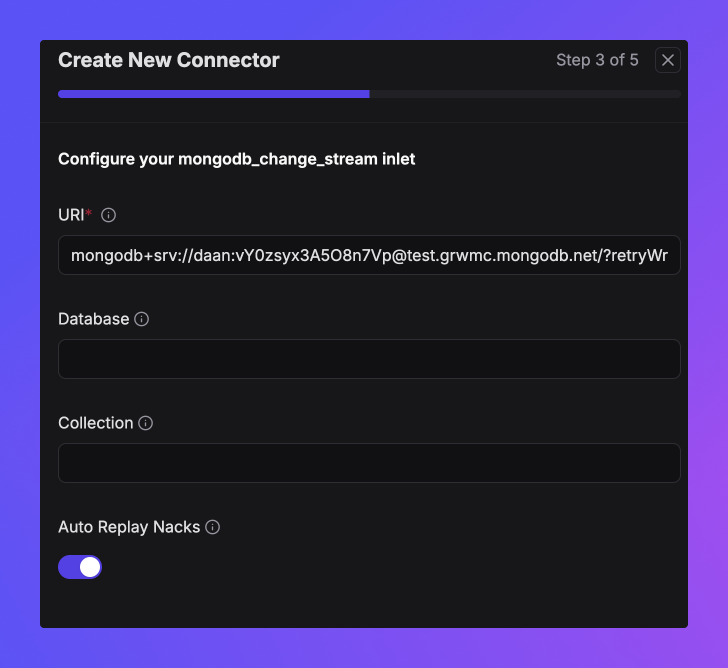
Since we are configuring an inlet, we need to define the input we want to use. The input is the “external system” side of the inlet and there are a whole bunch of them readily available.
We however, will be going for the MongoDB Change Stream. The next step will require us to define the different settings for our input. The MongoDB Connection String already contains most of the information, so we can just provide that one. Optionally, we could have limited the changes to a specific database and/or collection. If neither is provided, all changes are being captured.
One special configuration setting is Auto Replay Nacks. This setting allows the connector to automatically retry when a message could not be processed. Disabling this will just drop the change if it fails to process.
Onward to configuring the NATS side of our inlet. For that we will rely on the information we gathered previously. We’ll use a NATS user we created ahead of time named Connectors, but any user in your account will do.
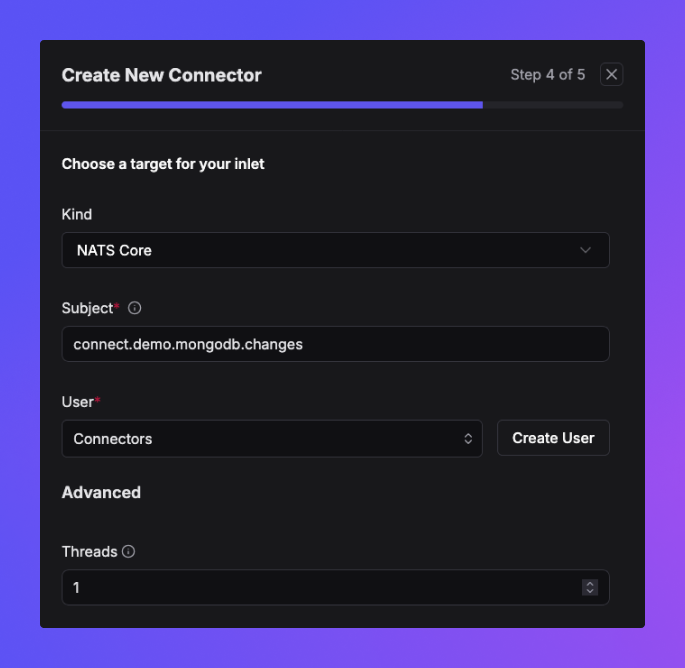
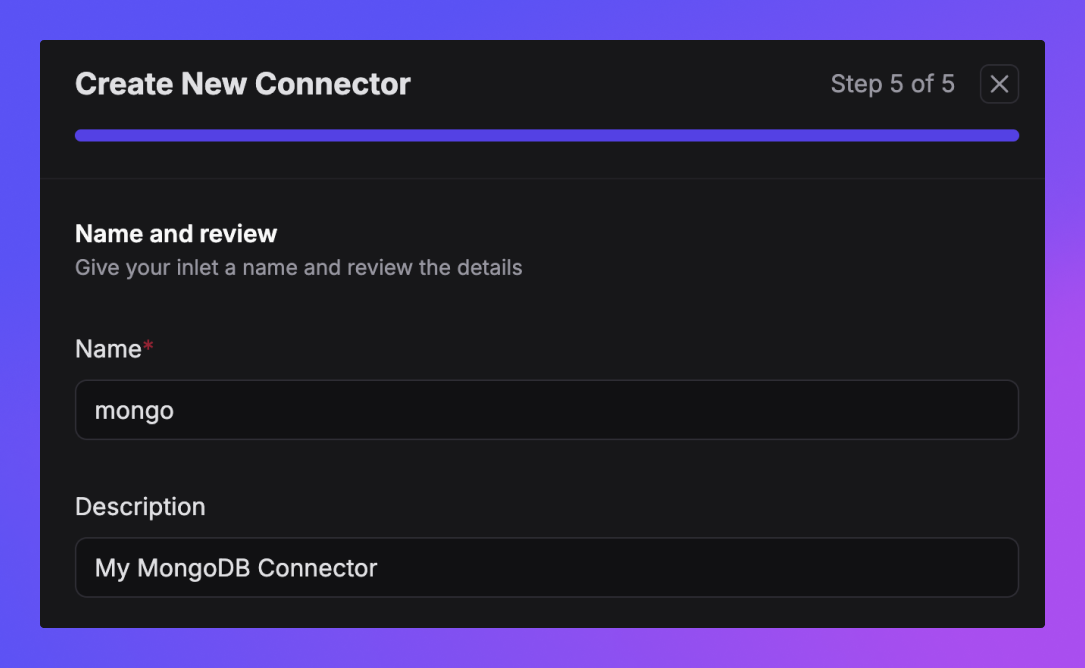
Before we can finish creating our connector, we need to give it a name. As with every great problem in life, this might take some creativity. Unfortunately, I am lacking that at the moment, which is why I will call mine mongo:
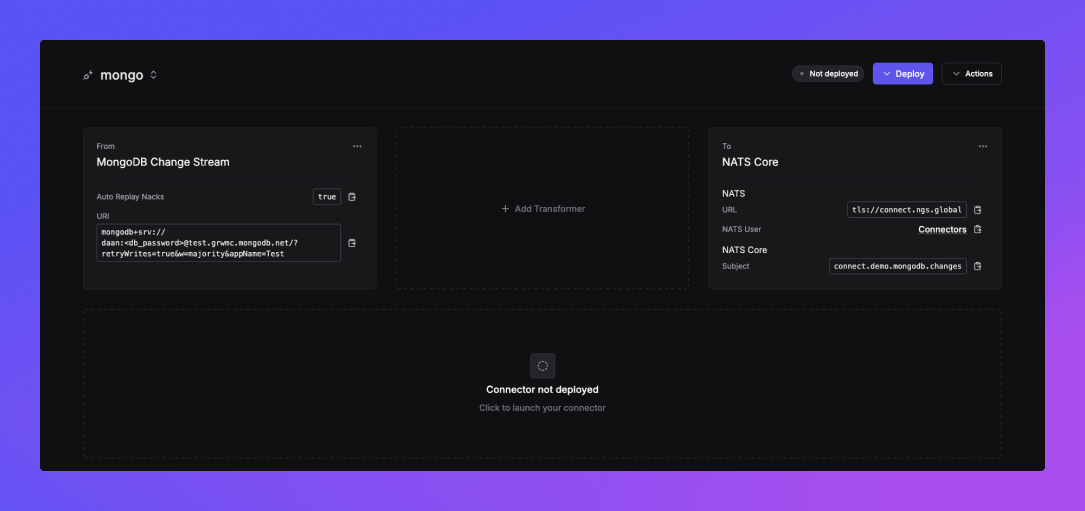
And there we go! Our first connector has entered the world. But it gets even better! Click on the connector name and you will get access to some detailed information about the connector.
Deploying
Before we get all warm and fuzzy, there is something more we need to do before we will see MongoDB changes being delivered to NATS. That’s right, we need to deploy the thing. Right now, the connector has not been deployed, which means it is not running yet. No problem, all we have to do is press that purple Deploy button.
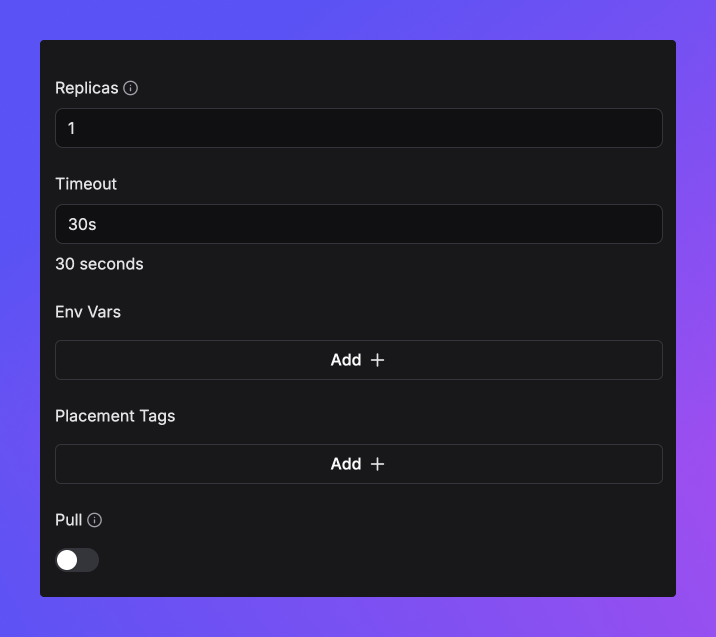
When deploying, you can provide hints on where you want your connector to run through placement tags. For example, If you want to make sure your connector is running in Europe, you can add geo:europe as a placement tag. If you also want to put your connector on AWS, you can add another placement tag with a cloud:aws value.
Continuing onwards!
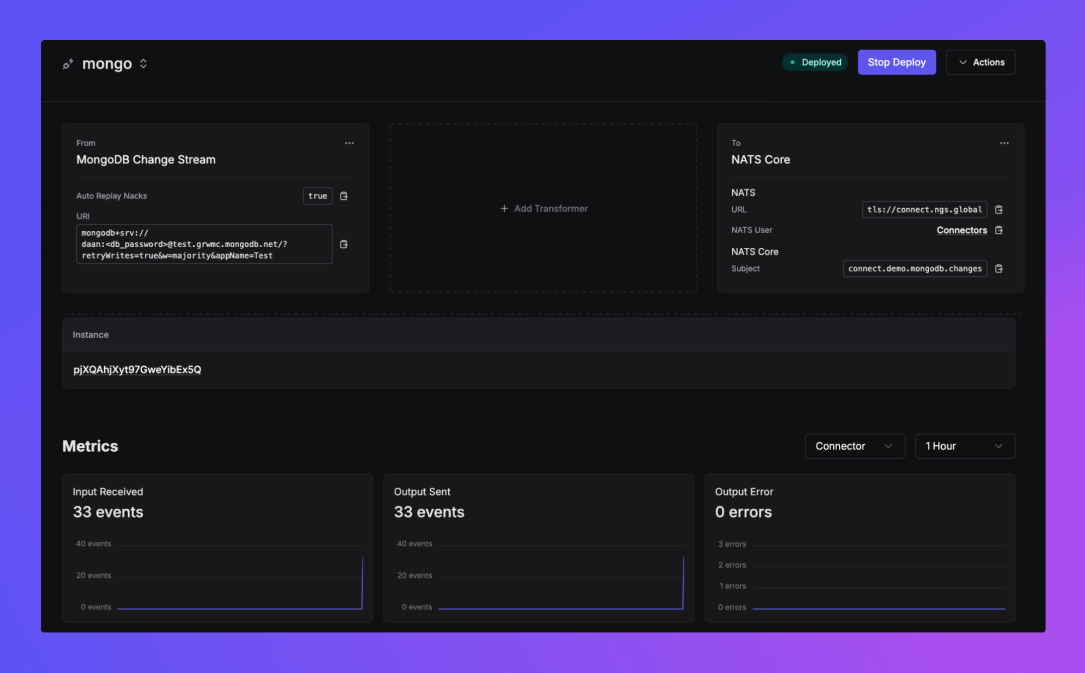
Time to celebrate, right? Our connector is deployed and metrics are flowing in, exactly what we wanted.
1[#1] Received on "connect.demo.mongodb.changes"2mongodb_change_stream_id: 83105880366885623993
4{"_id":{"_data":"82678A467F000000052B042C0100296E5A100424C558C56E1F4721B097B010F5B89258463C6F7065726174696F6E54797065003C696E736572740046646F63756D656E744B65790046645F69640064678A46627E471315006E6A61000004"},"operationType":"insert","clusterTime":{"$timestamp":{"t":1737115263,"i":5}},"wallTime":{"$date":"2025-01-17T12:01:03.169Z"},"fullDocument":{"_id":{"$oid":"678a46627e471315006e6a61"},"name":"Nate Natster"},"ns":{"db":"sample_mflix","coll":"comments"},"documentKey":{"_id":{"$oid":"678a46627e471315006e6a61"}}}
Changing Changes
Let’s take it to the next level, shall we? There comes a point when you will ask yourself: “Hey that looks great, but how do I change those messages as they come through?”.
Transformers allow you to do just that. For each message coming through, the transformer is executed and can change, or even drop the message all together.
Let’s first start with some simple transformer which alters the structure of the message. For that we will click on the Add Transformer box. We’ll use the default Mapping transformer. We then have the ability to write a mapping script using the Bloblang scripting language:
1root.id = this._id2root.db = this.ns.db3root.col = this.ns.coll4root.key = this.documentKey._id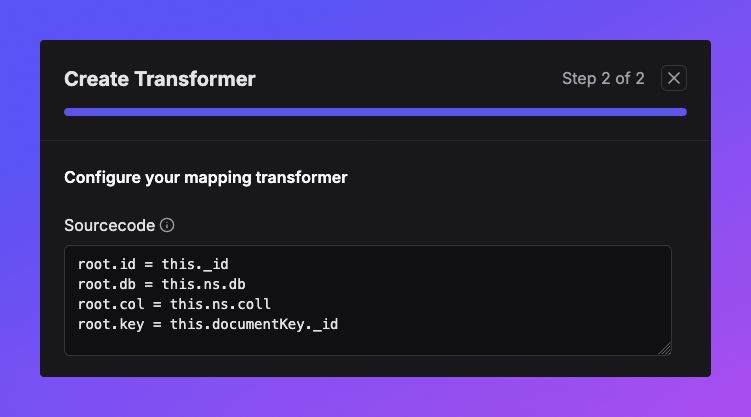
Once we submit our changes, we can stop our current deployment and start a new one.
1[#3] Received on "connect.demo.mongodb.changes"2mongodb_change_stream_id: 19433234944458981343
4{"col":"comments","db":"sample_mflix","id":{"_data":"82678A4A290000000B2B042C0100296E5A100424C558C56E1F4721B097B010F5B89258463C6F7065726174696F6E54797065003C696E736572740046646F63756D656E744B65790046645F69640064678A4A217E471315006E6A63000004"},"key":{"$oid":"678a4a217e471315006e6a63"}}
Pretty neat, right! Inserting and deleting documents look a bit different though. An insert message does not have the updateDescription field but instead provides a fullDocument.
1{2 "_id": { "_data": "..." },3 "operationType": "insert",4 "clusterTime": { "$timestamp": { "i": 4, "t": 1737104593 }},5 "wallTime": { "$date": "2025-01-17T09:03:13.142Z" },6 "ns": { "coll": "users", "db": "sample_mflix" },7 "documentKey": { "_id": { "$oid": "678a1caf7e471315006e6a60" }},8 "fullDocument": {9 "_id": { "$oid": "678a1caf7e471315006e6a60" },10 "email": "daan@synadia.com",11 "name": "Daan Gerits"12 }13}A delete message even doesn’t provide additional information except for the documentKey
1{2 "_id": { "_data": "..." },3 "operationType": "delete",4 "clusterTime": { "$timestamp": { "i": 1, "t": 1737107216 }},5 "wallTime": { "$date": "2025-01-17T09:46:56.103Z" },6 "ns": { "coll": "movies", "db": "sample_mflix" },7 "documentKey": { "_id": { "$oid": "573a1390f29313caabcd42e8" }}8}What if we are only interested in updates and want to make the data look cleaner? Well, hold my beer:
1root = if this.operationType == "update" {2  this.apply("map_update")3} else {4  deleted()5}6
7map map_update {8  let updates = this.updateDescription9
10  root.db = this.ns.db11  root.col = this.ns.coll12  root.key = this.documentKey._id."$oid"13  root.changes.updated = $updates.updatedFields.apply("sanitize")14  root.changes.removed = $updates.removedFields.apply("sanitize")15  root.changes.truncated = $updates.truncatedArrays.apply("sanitize")16}17
18map sanitize {19  root = if this == nil {20    deleted()21  } else {22    match {23      this == [] => deleted()24      this == {} => deleted()25      _ => this26    }27  }28}
Obviously this is a bit more advanced since it introduces a lot of features available through bloblang. These mapping transformers can range from very trivial things to super advanced, multi mapping code blocks.
Redeploying the transformer will result in the following messages when an update happens
1[#4] Received on "connect.demo.mongodb.changes"2mongodb_change_stream_id: 23210004503545708273
4{"changes":{"updated":{"email":"ned_starky@gameofthron.es"}},"col":"users","db":"sample_mflix","key":"59b99db4cfa9a34dcd7885b6"}
Dynamic subjects
Remember we configured the subject field of our connector as connect.demo.mongodb.changes? Well that field actually supports a bit of bloblang as well.
We can edit the producer side of our connector and change the subject to
1connect.demo.mongodb.changes.${!this.db}.${!this.col}.${!this.key}After redeploying, our subject is now constructed based on the data of the message:
1[#5] Received on "connect.demo.mongodb.changes.sample_mflix.users.59b99db4cfa9a34dcd7885b7"2mongodb_change_stream_id: 68873540148695375743
4{"changes":{"updated":{"email":"robert@gameofthron.es"}},"col":"users","db":"sample_mflix","key":"59b99db4cfa9a34dcd7885b7"}
Which begs the question, how can we leverage this new subject information? One of the superpowers of NATS is its token-based subjects and the ability to use wildcards when subscribing to them. Since subject filtering is performed on the server, the messages aren’t even sent to the client unless they match the subject filter.
This superpower becomes very interesting in our demo use case since it allows us to subscribe to selective changes instead of having to subscribe to the whole stream. Ideally we would want our demo subjects to look something like this:
1connect.demo.mongodb.changes.<db>.<col>.<key>That way we could subscribe to all changes for a specific collection, even across databases using connect.demo.mongodb.changes.*.my_collection.> as a subject filter.
Exciting!
Conclusion
With the introduction of Synadia Connectors, we add another powerful piece to the puzzle. NATS’ superpowers combined with Connectors’ flexible and scalable data integration fabric allows you to create non-trivial bridges, including transformations, in a matter of seconds.
As a reminder, the Wombat runtime supports a long list of sources and sinks, including MongoDB and the major AWS, Azure, and GCP data stores. Questions? Reach out to connect@synadia.com.
For customers on the Synadia Cloud Starter plan, you can now create and run connectors from your Cloud account - just enable the feature in settings.
Connectors will be rolling out to all other paid Cloud plans shortly. For Synadia Platform customers, please reach out for a guided onboarding to Connectors.
Related posts
All posts